CHAPTER
_
10
Equipment and Tuning
Good equipment and a well tuned bow are essential for good
performance, but it is important to recognize that equipment is only
supplementary and not ultimate. This chapter will try to approach this
from a practical point of view. Technology and our understanding of the
process have developed over the years, but the basic parameters for
tuning have changed very little. Excellent publications, such as the
Easton Tuning and Maintenance Guide are available free. This book will
therefore approach it from a down-to-earth point of view and share with
you how the top Australian Olympic archers tune their bows.


183
1
_
Equipment
The first thing any archer must realize is that equipment is only supplementary
not ultimate. Obviously, good equipment is essential for good performance, but
as with everything else, performance can not be bought, even though many
archers would have you believe it can.
This book will only very briefly touch on equipment, as many good books and
articles have been written on this subject.
The major bow and archery equipment manufacturers have some excellent
equipment on the market. Just look at the variety of equipment used by the top
shooters at any international tournament and you will see it is a matter of choice
or sponsorship, rather than bow ‘A’ being better than bow ‘B’.
The majority of bows on the market, if properly tuned, are all capable of
shooting 1300+ FITAs.
Technology has developed over the years and will continue to develop, but it
might be well worth to remember that in the past, many a 1300+ Men’s FITA
has been shot with fiberglass limbs and aluminum arrows. However, carbon
arrows will provide a distinct score advantage in the hands of an experienced
archer.
It really is a personal choice of what equipment and accessories to buy to suit
the budget and skill level of each individual.
The biggest impact on performance is PROPER FORM AND PROCESS.
Equipment and Tuning
CHAPTER_10

2
_
Tuning
Any archery book would not be complete without a chapter on tuning. Though
tuning is an important aspect for performance, very often archers become
preoccupied with the tuning of their equipment to achieve maximum performance
and sometimes to the extent that they forget that their form plays a critical role in
the process. An archer can only tune his equipment to his level of competency.
Nonetheless, it is important to tune the equipment and match it to the archer’s
form and physique.
Easton has developed an excellent tuning guide, called, ‘Easton Arrow Tuning
and Maintenance Guide, 2nd Edition, rev. 4/99’. This comprehensive 32 page
document can be downloaded free from their website. This tuning guide has
been accepted worldwide, as the universal guide for tuning.
The following information provides an uncomplicated approach to bow tuning,
although mostly it corresponds with Easton’s tuning recommendations.
Generally, too much time is spent on tuning. A quick tuning check should be
made maybe once every month.
The following steps should achieve a good basic tune-
1. Main Steps
Straightness of the bow Tiller
Center shot Nocking point
Brace height Bare shaft
Arrow stiffness
184
TOTAL ARCHERY

a) Limb alignment
Is it important?
It is not critically important, as Darrell Pace showed when he won the 1976
Olympics and set various World and Olympic records with a bow that had twisted
limbs. Similarly, Rick McKinney won the Word Championships in 1983 with a riser
that was 3/16” out, shooting scores of 1312 and 1305.
Even though this demonstrates that it is not as critical as might have been thought,
nevertheless straight limbs will make it a lot easier to line-up center shot, rather than
it becoming a grey area of uncertainty.
Many of the bows on the market employ various systems to adjust and line up the
limbs with the riser. Some of the systems can be quite tricky and patience is required
to achieve good results. At times, the limbs might appear to line up but then the
stabilizer might be pointing left or right when lined up with the arrow on the string.
The bushing being angled in the riser could be the cause of this, but more often than
not, the limbs and riser are not properly lined up. This could result in the plunger
button not making full contact with the arrow, because the riser would be slightly
angled.
It can take quite a bit of time and patience to straighten and line up everything to
ensure that it will react in the best possible way; however it is worthwhile to persevere.
It is not that the bow would shoot badly but every time when coming to full draw it
could be distracting to the archer to see that the stabilizer is not lining up properly with
the arrow. This could also cause a possible loss of confidence.
It is always easy to blame the equipment when things are not going well. It is
therefore important that the archer fully understands his equipment and what tuning
is all about. We must have confidence in our equipment, so that when things are not
going right we will work on the most common culprit, our form.
185

b) Tiller
What is tiller?
There are two types of tiller, dynamic and static.
Dynamic tiller is the timing of the limb tips coming forward and applying the force to
the string on release. Dynamic tiller is related to the nocking point position on the string.
Static tiller affects the way a bow feels when at full draw. Keeping in mind that the
bow hand is not in the middle of the bow and further, no set of limbs can be made
exactly the same. Therefore, at full draw these imbalances become important as to how
easy the bow will aim. If the balance of the limbs is off, either the top or bottom limb
will come faster towards the archer, when drawing the bow. This will cause the archer
to unconsciously change hand pressure on the bow grip to keep the bow or bow sight
level. As a rule of thumb, top tiller has commonly been set to be about 3/16 – 1/4 inch
greater on the top limb to counteract this tendency. However, with changes in bow
design some of the bow grips have been relocated closer to the center, which can result
in changes from this standard. In addition, the type of grip, high, medium or low will
affect the hand pressure point on the grip and as such tiller.
A simple test is to draw the bowstring back slowly in a straight line to your anchor
point without any up or down movement. Have someone else observe the end of your
stabilizer; if it goes up the top limb is leading (stronger) and top tiller should be
increased, or alternatively the bottom tiller can be decreased. On the other hand if the
end of the stabilizer goes down, the bottom limb is leading (stronger) and top tiller
should be reduced or alternatively bottom tiller can be increased. A further check
would be to go to 30M using a 40cm target on the butt. Now do the same test and set
the sight pin on the Gold and draw back slowly; if the sight pin goes up above the Gold
the top limb is stronger, or if down below the Gold the bottom limb stronger. Adjust as
per above advice.
Tiller is also a bit of a personal preference. Some of the top archers prefer the top limb to
186
TOTAL ARCHERY
lead, others the bottom limb, others again want a neutral feeling. Therefore, tiller is highly
individual and the archer should experiment a bit to see what feels and groups best. For
rank beginners set the tiller on the top limb 3/16 - 1/4 inch greater than bottom limb.
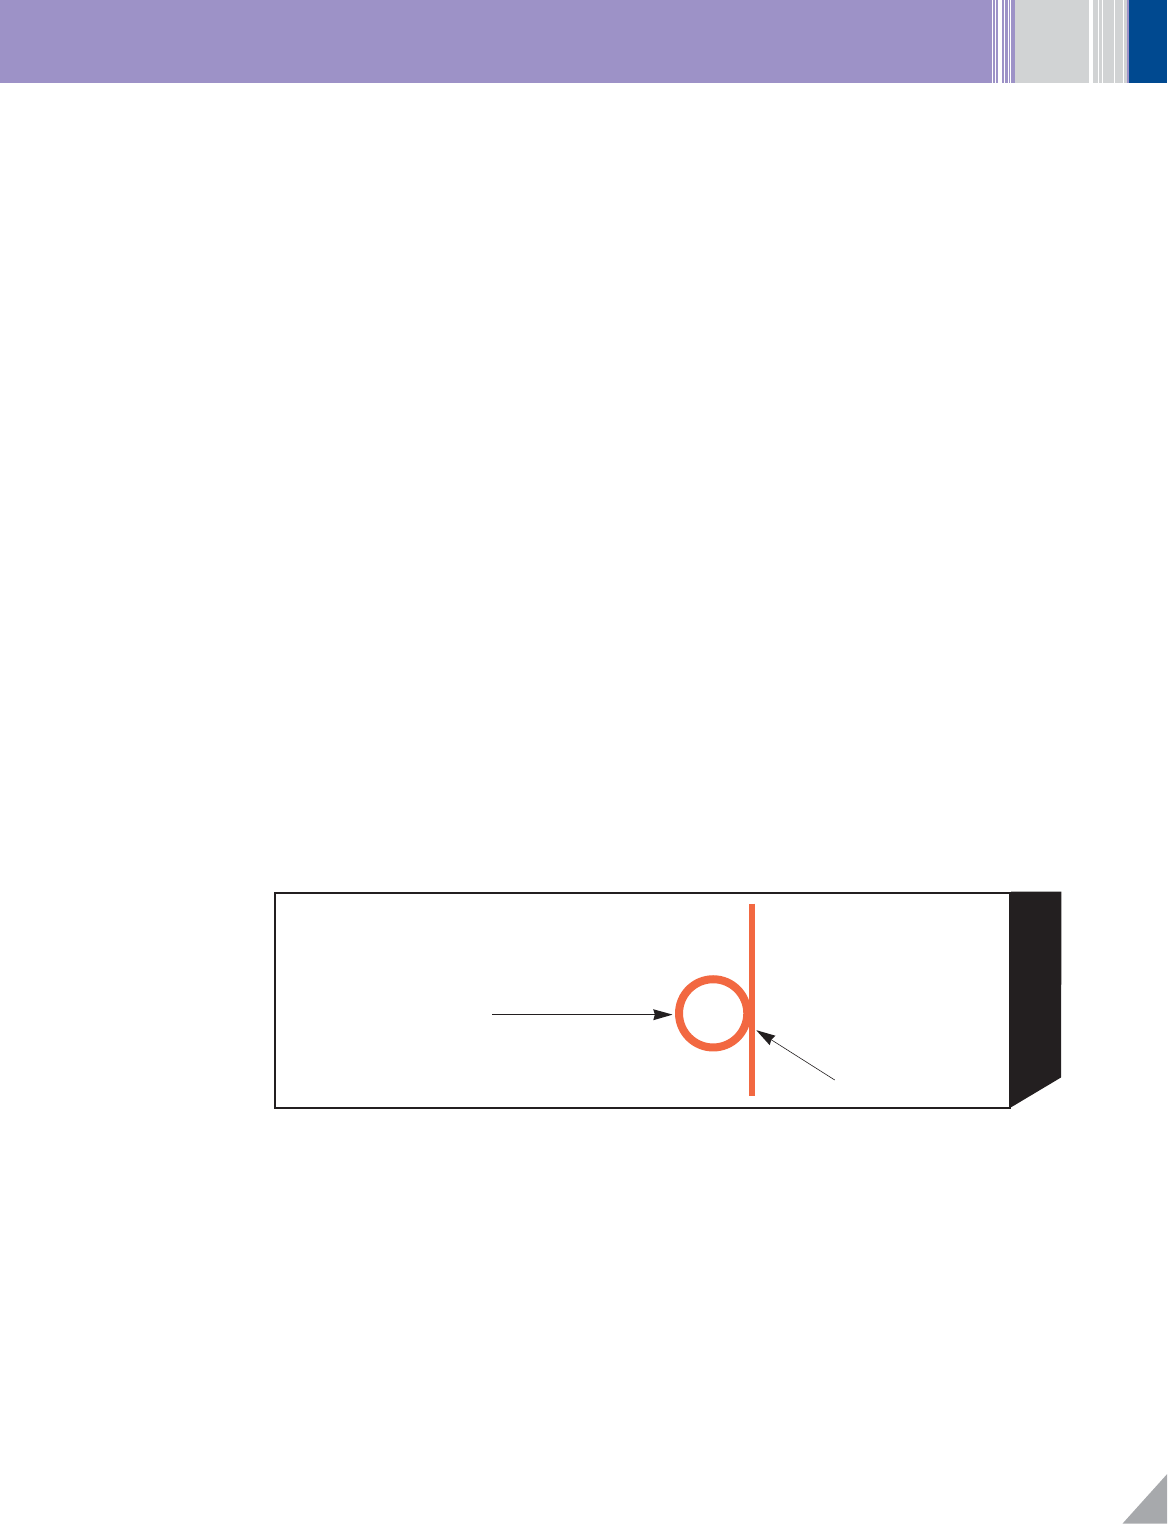
c) Center shot
As discussed under ‘Limb alignment’ it makes it easier to find the center of the
bow and limbs if the bow is straight and/or has been adjusted correctly. A set of
Beiter Limb Gauges, which clip on to the limbs and have two lines to indicate the
center of the limbs, make it easy to line up the string with the center of the limbs.
Alternatively, attach a piece of masking tape on both top and bottom limbs about 4”
from the riser and measure and mark the center with a solid black line. With these
two methods, when standing directly behind the bow, the archer can line up the
string with the marks on the tape or limb gauges. On a recurve bow the arrow should
be slightly left of center (right-handed archer), by adjusting the plunger button in or
out. See sketch below.
d) Brace height
Brace height used to get a lot of attention in the past, but does not seem to be as
much of an issue now. Nevertheless, it is quite important, as basically the brace
height determines when the arrow nock will leave the string at a certain point in the
187
Diagram No. 11
_
Center Shot
Carbon arrow shaft
Bow String

188
TOTAL ARCHERY
arrow’s bending cycle. It has been found that there are generally two brace heights at
which the bow is quietest and good scores can be obtained with either brace height.
However, the lower brace height could produce some unexplained flyers. Therefore,
it is best to start in the middle of the manufacturer’s recommended brace height
range for the particular bow. Shoot a few arrows at various brace heights within the
range and listen for when the string sounds quietest, as this is the point where the
arrow nock leaves the string at the right moment.
A high or harsh sound is usually an indication of incorrect brace height or an
incorrectly spined arrow. To adjust the brace height, either twist the string up or
down.
e) Bare shaft tuning
What does shooting a bare shaft show us?
Shooting a bare shaft will assist us in determining if the arrow has the correct
spine for the set-up of the bow. Secondly, it will assist us in establishing the
proper nocking point position. Both items are adjustable within accepted bounds
and are discussed below.
It is recommended to use at least three fletched and three bare shafts for tuning.
Even though most shafts are within close tolerances, any small variations in the
bare shaft, which will not show up when fletched, could result in mismatched
tuning. For that reason, three shafts will give a more reliable indication and will
show up any rogue shaft in the trio.
Correct nocking point height can have a considerable affect on the spine of the
arrow. Therefore, before we start “playing” around with spine adjustment, we must
determine the correct nocking point position. Conventional wisdom has the nocking
point at about 3/16” – 3/8” above square, measured to the underside of the nock. This
is a good starting point. It should also be recognized that looking at relative angles, a

189
longer arrow of say 31”, may need a higher nocking point than a 26” arrow.
It is recommended to start by setting the plunger button spring tension at about
medium pressure or at approximately 60% of its range. At this stage, we are not
yet interested in the spine of the arrow, only the desire to achieve the bare shafts
impact at the same height as the fletched ones. If the bare shafts impact above
the fletched arrows, move the nocking point up and if they impact below, move
the nocking point down. Once the bare and fletched shafts impact at the same
level, we can move to the next step of tuning by trying to match the dynamic
spine of the arrow to the equipment and form of the archer. Many items can have
an impact on the dynamic spine of the arrow, such as,
archer’s shooting form
arrow length
point weight
string material
number of strands in string
type of nocking point (serving or metal nocks)
fletch type and length
type of nock
draw weight of bow
draw length
stabilization
plunger button setting
brace height
arrow alignment
etc.
As can be seen, numerous items can affect arrow spine, which can become
very confusing for beginning archers and even some more experienced archers.
However, even though this could be confusing, let us focus on the foremost
items that we can “play” with to tune for correct spine. That is, assuming we
have determined proper brace height, nocking point, draw length, tiller and
center shot, as previously discussed and that the arrow selected is based on the
manufacturer’s recommendation for the specific set up.

Even though recognizing that all the items mentioned can have an effect on the
dynamic spine of the arrow, the three main items we should work with, before
“playing” with any of the others are-
Plunger button tension
Point weight
Bow draw weight
We must understand that one of the main reasons to adjust the dynamic spine
of the arrow is to ensure that it will clear the bow properly, so that on release it
will bend around the rest and riser without interference.
f) Tuning for spine
Again, we will use three bare and three fletched shafts, shooting them from
30M. If the bare shafts impact within 3 inches of the fletched arrows, you most
likely will be able to adjust it by increasing or decreasing plunger tension. If the
bare shafts impact to the left (stiff, RH archer) of the fletched ones, decrease
plunger pressure and if to the right (weak), increase button pressure.
If plunger pressure adjustment alone is not sufficient to land the bare shafts
within the fletched group, change in point weight should be considered. Hence,
if the bare shaft shoots weak, reduce point weight or if it shoots stiff, increase
point weight. If all this fails, one of the biggest effects on arrow spine is the
adjustment of the actual bow draw weight. Both bottom and top limb bolts must
be adjusted up or down by the same amount, otherwise the tiller and nocking
point height will be affected. If half to one full turn up or down on the top and
bottom limbs still does not give the desired spine, then a different spined arrow
should be tried, either stiffer or weaker as indicated by the tuning.
190
TOTAL ARCHERY

Tuning at the 30M distance is far enough to see shaft behavior, but is not too
far to be influenced by external factors such as wind.
It must be recognized and accepted that tuning is never the same from day to
day. There are many factors influencing the tune, e.g. the individual’s skill level,
but even more on how the archer feels, physically and mentally, on the day.
Remember that equipment is not ultimate!!!
Some other points to be mindful of;
The long Beiter out nocks will make the arrow shoot slightly weaker
A brass nock on the string in lieu of a nocking point made of serving
material can affect the bare shaft at 30M by as much as 6”
Remember that a perfect tune today, won’t necessarily be a perfect tune
tomorrow or next week, as you feel differently within yourself from day to
day, which will have an effect on your tune.
g) Arrow balance - F.O.C. (Front of Center)
The importance of F.O.C. is greatest over the long distances of the FITA round,
especially over 90M.
F.O.C. describes the percentage of the arrow’s total weight that is located in the
front half of the arrow. The more weight that is located in the front half of the
arrow, the more forward is the center of balance of the arrow. Changes in F.O.C.
affect the arrow’s trajectory and as such, it is not very important for short ranges
and indoor archery.
To determine F.O.C. refer to Easton’s drawing and formula below.
191

192
TOTAL ARCHERY
It has been found that an arrow with a heavy point will track better in the wind, irrespective
of spine. For most cases, it is recommended to use at least 100 grain points or more for best
effect, as it seems to provide for a more forgiving arrow, handling weather conditions better.
When preparing for the Olympics, my archers were given 3 dozen X10 arrows. From
those they had to select a set of competition arrows. They chose the shafts by shooting
them all bare shaft at 30M. This process was repeated three times, anything in the Gold
was put aside for competition; the others were kept for practice. Although there would
not be much difference when all the arrows are fletched, it does give the archers the
confidence that they have the best set of competition arrows possible.
h) How often to tune?
As stated previously, the tune of a bow can change from day to day, depending on
the archer’s form and feelings. Therefore, tuning should be performed maybe once a
month. If a couple of spare bare shafts are kept, a quick check can be made now and
then. The archer’s form has a bigger impact on the tune than anything else,
especially when an archer is working on changing form and body position.
Like anything else, performance cannot be bought, regardless of the frequency of tuning.
Determining F.O.C.%
AMO-Standard F.O.C. balance formula
F.O.C. % =
100
(A-L/2)
L
L = Correct Arrow Length - Distance from bottom of nock groove to end of & shaft
A = Distance from bottom of nock groove to finished arrow balance position
(includes weight of point [+insert], nock system and fletching)
L = Correct Arrow Length
1/2 Length = L/2
F.O.C.
Distance
Front-of-Center balance position
of the finished arrow
Center of
Correct Arrow Length
Diagram no. 12
_
F.O.C.
