
CY2021 Bid Pricing Tool Technical Instructions
Last updated January 2020

CY2021 Bid Pricing Tool Technical Instructions
2
Table of Contents
1.0 Introduction ................................................................................................................... 4
1.1 New Features for CY2021 ............................................................................................ 5
2.0 Bid Pricing Tol Function ................................................................................................ 6
2.1.1 Download and Installation ....................................................................................... 6
2.1.2 Opening the BPT .................................................................................................. 11
2.1.3 Populating the BPT working file ............................................................................ 15
2.1.4 Finalizing the BPT for submission ......................................................................... 23
2.1.5 Closing the File ..................................................................................................... 25
2.1.6 Password Protection ............................................................................................. 26
2.1.7 Print Functionality ................................................................................................. 26
2.1.8 New Releases....................................................................................................... 26
2.1.9 Batch Process Tool ............................................................................................... 27
2.1.10 Accessibility Features ........................................................................................... 33
3.0 How To… ................................................................................................................... 37
3.0.1 Download a Blank Stand-alone BPT Workbook .................................................... 37
3.0.2 Download and Launch the Batch Process Tool ..................................................... 37
3.0.3 Update the BPT Add-In ......................................................................................... 38
3.0.4 Update the Add-In for Multiple BPT Workbooks Using the Batch Tool .................. 39
3.0.5 Finalize an Individual BPT Workbook .................................................................... 39
3.0.6 Finalize Multiple BPT Workbooks Using the Batch Tool ........................................ 40
3.0.7 Use the Backup File to Restore a Prior Version of the BPT................................... 40
3.0.8 Re-start the Batch Process if it is Abnormally Terminated ..................................... 41
3.0.9 Update PD National Averages in Multiple PD files ................................................ 41
3.0.10 Update Multiple MA Files with PD Premiums ........................................................ 41
4.0 Troubleshooting and FAQ ........................................................................................... 43
4.1.1 Problems with the Add-In File ............................................................................... 43
4.1.2 Missing Add-in from the Toolbar ........................................................................... 44
4.1.
3 Frequently Asked Questions ................................................................................. 44
4.1.4 Support ................................................................................................................. 56

CY2021 Bid Pricing Tool Technical Instructions
3
Table of Figures
Figure 1 - Excel 2013 – Advanced Settings - Users Disable hardware graphics acceleration ...... 7
Figure 2- Bid Software – PBP Data Entry Software ..................................................................... 8
Figure 3 – Bid Software – BPT Add In & Spreadsheets ............................................................... 9
Figure 4 - An Excel Macro Settings ........................................................................................... 12
Figure 5 - Active X Settings ....................................................................................................... 12
Figure 6 - BPT Add-in Error....................................................................................................... 13
Figure 7 - Add-in Menu Functions ............................................................................................. 14
Figure 8 - Protected Excel Functions Toolbar ........................................................................... 20
Figure 9 - Batch Tool Validation Report .................................................................................... 28
Figure 10 - Batch Tool Version Update ..................................................................................... 29
Figure 11 - Batch Tool Finalize BPT .......................................................................................... 30
Figure 12 - Batch Tool Update PD National Avg ....................................................................... 31
Figure 13 - Batch Tool Update Prem in MA ............................................................................... 32
Figure 14 - Keyboard Navigation Instructions ............................................................................ 35
Figure 15 - Batch Tool Executable File ..................................................................................... 38
Figure 16 - BPT Addin Location ................................................................................................ 39
Figure 18 - Error Message 1 in MA BPT.................................................................................... 45
Figure 19 - Error Message 2 in MSA BPT ................................................................................. 46
Figure 20 - Error Message in PD BPT ....................................................................................... 46
Figure 21 - BPT Addin Error ...................................................................................................... 47
Figure 22 - Run Time Error ....................................................................................................... 48
Figure 22 - Run Time Error ....................................................................................................... 48
Figure 23 - BPT Batch Process Finalization Error ..................................................................... 50
Figure 24 - Dependency and Execution Files ............................................................................ 51
Figure 25 - BPT Finalization Error ............................................................................................. 52
Fi
gure 25 - BPT Finalization Error ............................................................................................. 53
Figure 26 – Run-Time Error 50290 ............................................................................................ 53
Figure 27 – Add- Ins Window .................................................................................................... 54
Figure 28 – BPT Add-in Error .................................................................................................... 55

CY2021 Bid Pricing Tool Technical Instructions
4
1.0 Introduction
The Bid Pricing Tool (BPT) is a group of Microsoft Excel workbooks that organizations use to
develop and submit the pricing components of their Medicare plan bids. The workbooks are
enhanced with special features that facilitate and standardize the bid pricing process. These
instructions explain the special features and other technical aspects related to using the BPT. CMS
recommends that users read this document thoroughly before using the BPT.
The BPT system is comprised of four Excel workbooks. They correspond to the types of bids
organizations can submit to CMS; their filenames, for contract year 2021 (CY2021), are:
1. CY2021_MA_BPT.xlsm for Medicare Advantage (MA) bids,
2. CY2021_MSA_BPT.xlsm for Medical Savings Accounts (MSA) bids,
3. CY2021_PD_BPT.xlsm for Prescription Drug (PD) bids, and
4. CY2021_ESRD_SNP.xlsm for End Stage Renal Disease – Special Needs Plans (ESRD-
SNP) bids.
The BPT employs four versions of these workbooks that serve different purposes throughout the
bid price development process:
• Working files – are read-write enabled files that allow users to enter data in specified input
fields; bid prices are automatically calculated (in calculated fields) via formulas resident in
the files. Users may edit, save, name, and re-name working versions of the BPT workbooks.
• Finalized files – are read-only files created by a process called finalization, which modifies
the format of working files to prepare them for submission to CMS. Finalization converts
formula results in calculated fields into hard-coded values, removes formulas and other
extraneous elements, and saves the file using a standard naming convention. All BPT
functionalities are disabled. The finalized save process will delete or standardize some of
the data in the finalized file according to specified business rules. The finalized save
process will not change the data in the working file. (See Section 2.1.4.1.)
• Backup files – are also read-only files created by the finalization process. The backup file
uses the same filename as the finalized file with the word “backup” and a timestamp
appended to it. The data in the backup file is the same as that in the working file; removal
of the text “backup” from the filename will make the backup file editable. As such, backup
files enable users to convert backup files back into working files—if needed—for further
modification.
• BPT XML file – An XML file generated from the finalized save process. The file is
generated with a standard naming convention with the extension .xml. The XML file will
contain only data pertinent to upload.
o Example: H1234567123MA.xml.
The XML file is not to be modified after finalization of the BPT and must be uploaded
alongside the finalized BPT .xlsx file of the same name.

CY2021 Bid Pricing Tool Technical Instructions
5
1.1 New Features for CY2021
There are no significant new features for CY2021. The changes are limited to annual updates and
minor updates as identified below:
1. Removal of the Utilizer Inputs – Section III – MA Worksheet 1.
2. Addition of VBID-H indication – MA BPT and PD BPT.
3. Addition of ‘Claims Subject to Deductible’ input – PD Worksheet 6.
4. Updated Mapping for several cell in the PBP to BPT Mapping section – MA Worksheet 3.

CY2021 Bid Pricing Tool Technical Instructions
6
2.0 Bid Pricing Tol Function
2.1.1 Download and Installation
2.1.1.1 Configuration Requirement
For the BPT to work properly, you must configure your PC to satisfy the following requirements.
BPT is only supported on Windows; it cannot be utilized on MAC:
• Have Microsoft Excel 2010, 2013, or 2016 installed.
o The BPT will work with either 32 bit or 64 bit versions of Excel.
o Note: In CY2022 support of Excel 2010 will be discontinued.
• Create a folder under C:\BPT\ BPT2021.
• Users must keep the Add-Ins ribbon enabled.
Note: The BPT-specific icons are loaded with the Add-Ins ribbon enabled whenever a
workbook is opened. If the Add-Ins ribbon is disabled, the BPT-specific icons will be
removed and will not re-appear until the workbook is re-opened.
• For Excel 2010, 2013, and 2016, set your Excel Macro Security Settings to “Disable all
macros with notifications.”
• Enable macros when you open the BPT workbook.
• Copy BPT Add-in (BPT2021.xlam) in the C:\BPT\BPT2021 folder.
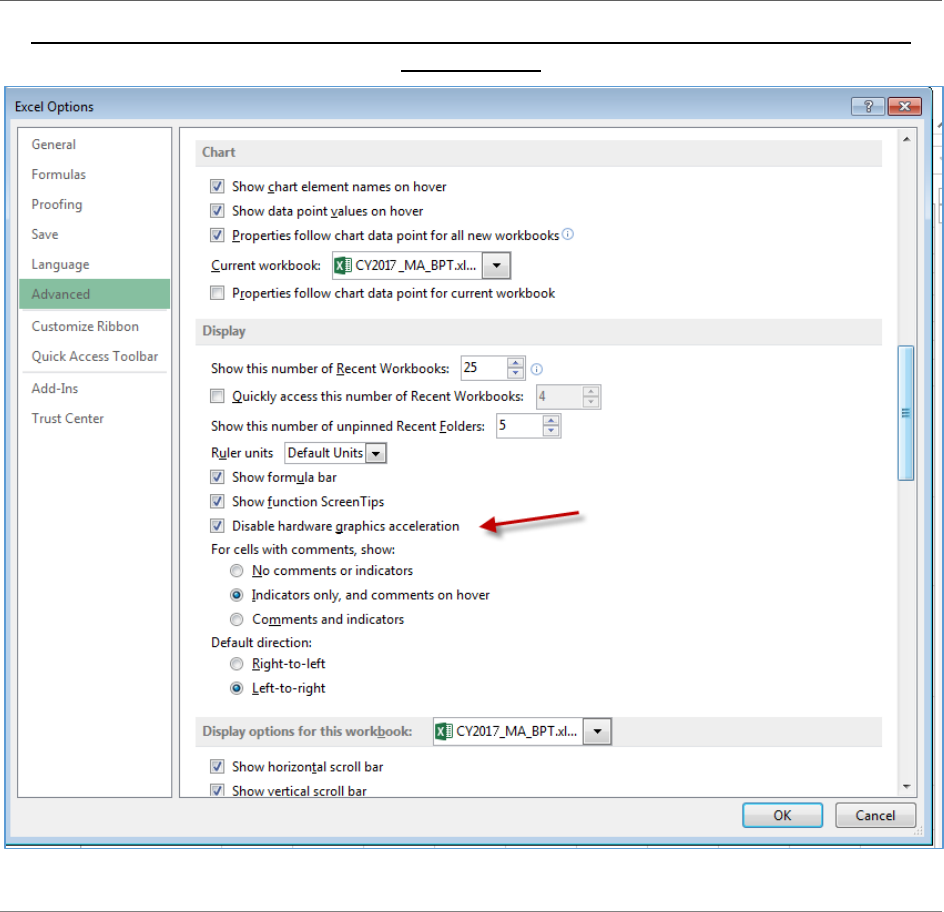
• For Excel 2013 users, set your display settings under Excel advanced options to “Disable
hardware graphics acceleration”.
CY2021 Bid Pricing Tool Technical Instructions
7
Figure 1 - Excel 2013 – Advanced Settings - Users Disable hardware graphics
acceleration
2.1.1.2 Installing the Add-in File
The CY2021 BPT is comprised of the following three Microsoft Excel file types:
1. Working BPT Files: MA, PD, MSA and ESRD-SNP (.xlsm files)
2. Finalized BPT Files: MA, PD, MSA, and ESRD-SNP (.xlsx files)
3. Macro code: BPT Add-In (.xlam file).
The BPT workbook file contains the BPT worksheets in which bid pricing is calculated based on
user-entered data. The BPT Add-in contains the code that supports the BPT workbook
functionality.
The BPT workbooks and the BPT Add-in files can be downloaded as part of the Plan Benefit
Package (PBP) software or as separate stand-alone files:
CY2021 Bid Pricing Tool Technical Instructions
8
• The BPT workbooks and the BPT add-in files can be downloaded with the PBP software,
which contains MA, PD, MSA and ESRD-SNP benefit information. To download the BPT
workbooks as part of PBP:
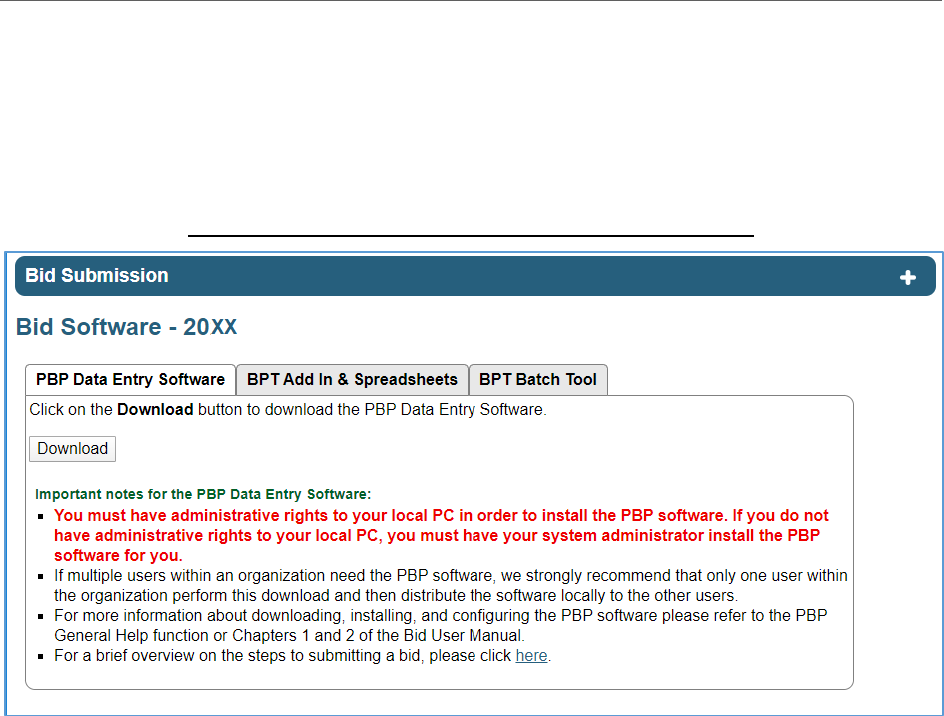
ο Go to the Health Plan Management System (HPMS) website and select Plan Bids
> Bid Submission > CY 2021 > Download - Bid Software (Figure 2- Bid Software
– PBP Data Entry Software)
Figure 2- Bid Software – PBP Data Entry Software
ο From the tab ‘PBP Data Entry Software’ See Figure 2- , click the ‘Download’
button. An executable file, SetupPBP2021.exe will begin the installation when
executed (double-clicked).
• Click ‘Next’ to install the file.
• Click ‘Yes’ on the Disclaimer
• Select the file destination and click ‘Next’. Files by default are downloaded
to a folder of your choosing; the Add-in file is saved in C:\BPT\BPT2021.
(If the BPT2021 folder does not exist, the PBP process will create it.)
• Click ‘Install’.
• The BPT workbooks and add-in are downloaded to C:\BPT\BPT2021
folder.
ο This installation process supports BPT data pre-population from the PBP. (See
Section 2.1.2.3, “Data Pre-population,” below.)
• You can also download the BPT add-in file and a blank BPT workbook separately to your
PC. To download the BPT add-in file and blank BPT workbooks as separate stand-alone
files:
CY2021 Bid Pricing Tool Technical Instructions
9
ο Go to the HPMS website and select Plan Bids > Bid Submission > CY 2021 >
Download – Bid Software.
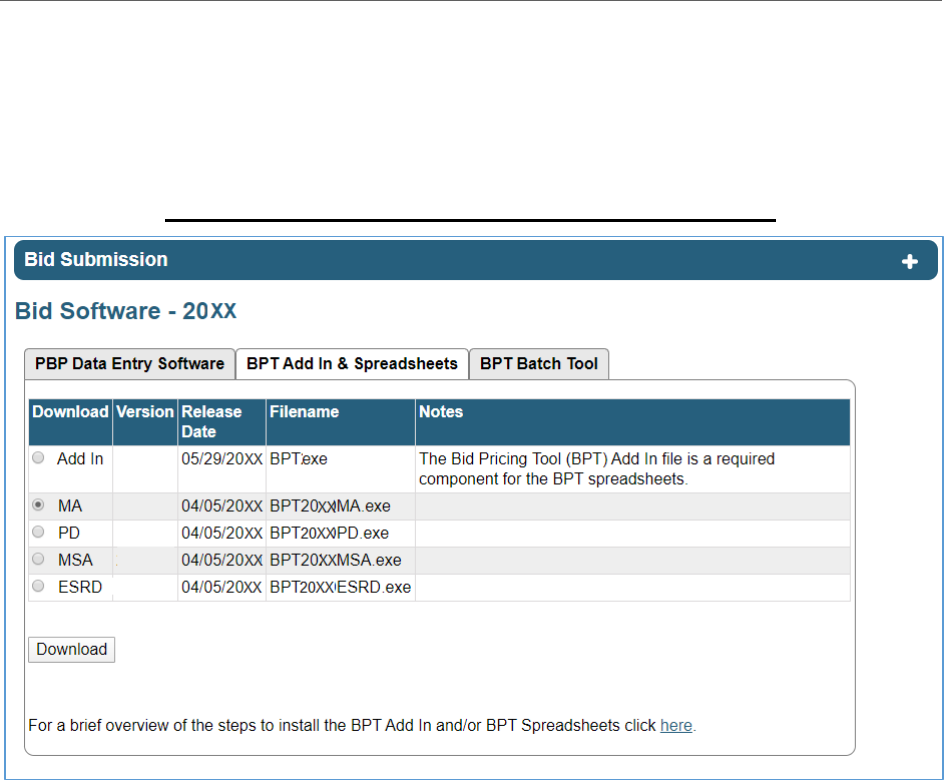
ο From the Bid Software page click the ‘BPT Add In & Spreadsheets’ tab (Figure 3
– Bid Software – BPT Add In & Spreadsheets).
Figure 3 – Bid Software – BPT Add In & Spreadsheets
ο Read the BPT instructions and select the Add-in or Workbook(s) to download BPT
Add-in.
ο Click the ‘Download’ button. An executable file, will begin the installation when
executed (double-clicked).
ο Unzip the file to download to the C:\BPT\BPT2021 folder. The Add-in file must
be saved in C:\BPT\BPT2021.
ο This installation process does not support data pre-population from the PBP (i.e.,
the workbooks are blank).
Note: You must create the C:\BPT\BPT2021 folder and save the BPT Add-in file to the
BPT2021 folder. If there is an existing BPT2021.xlam file in the C:\BPT\BPT2021 folder,
you must always overwrite the existing BPT Add-in (BPT2021.xlam) file saved on your
PC with the most current version. (Do NOT move/copy the add-in to another location on
your PC.) BPT’s that are prepared by user may be stored anywhere on the user’s PC.
If you do not save the BPT Add-in file in the designated folder, you will receive a message within
the BPT workbook stating that the BPT2021.xlam (BPT Add-in) file cannot be found. The BPT

CY2021 Bid Pricing Tool Technical Instructions
10
will open in read-only mode. If the BPT Add-in is not saved in the correct folder, you will not
be able to use the BPT.
The BPT add-in does not interfere with any non-BPT files.
For users that prepared BPTs for previous contract years, BPT Add-in files should be left in
place from previous years. Leave all previous contract years in their respective folders. ( e.g.
C:\BPT\BPT2020 or BPT2019).

CY2021 Bid Pricing Tool Technical Instructions
11
2.1.2 Opening the BPT
2.1.2.1 Macro Security Level Setting
BPT working files and the Batch tool are supported in Excel 2010, 2013, and 2016.
1. For Excel 2010, 2013, and 2016, the security setting options are “Disable all macros
without notification,” “Disable all macros with notification,” “Disable all macros except
digitally signed macros,” and “Enable all macros.”
o For security reasons, it is recommended that you set the setting to “Disable all
macros with notification.”
2. Under the “Disable all macros with notification” setting, the workbook will open with a
Splash screen (i.e., a static information screen) and you will see an Option button and a
message: “Security Warnings. Macros have been disabled.”
o You must click the Option button and select “Enable this content”.
o The workbook will then open with the Add-in loaded. The Add-in icons will be
part of the Add-Ins ribbon.
3. Under the “Disable all macros with notification” setting, it is possible that the workbook
will open and be editable without the Add-in loaded. This may be due to previous Excel
instances that were not closed correctly.
o In this situation, you must select “Enable this content” to load the add-in.
o Do NOT save any changes in the workbook until you select the “Enable
Macros” option.
o The BPT file will not function properly until the Add-in is loaded (when all add-in
icons appear on the Add-in toolbar.)
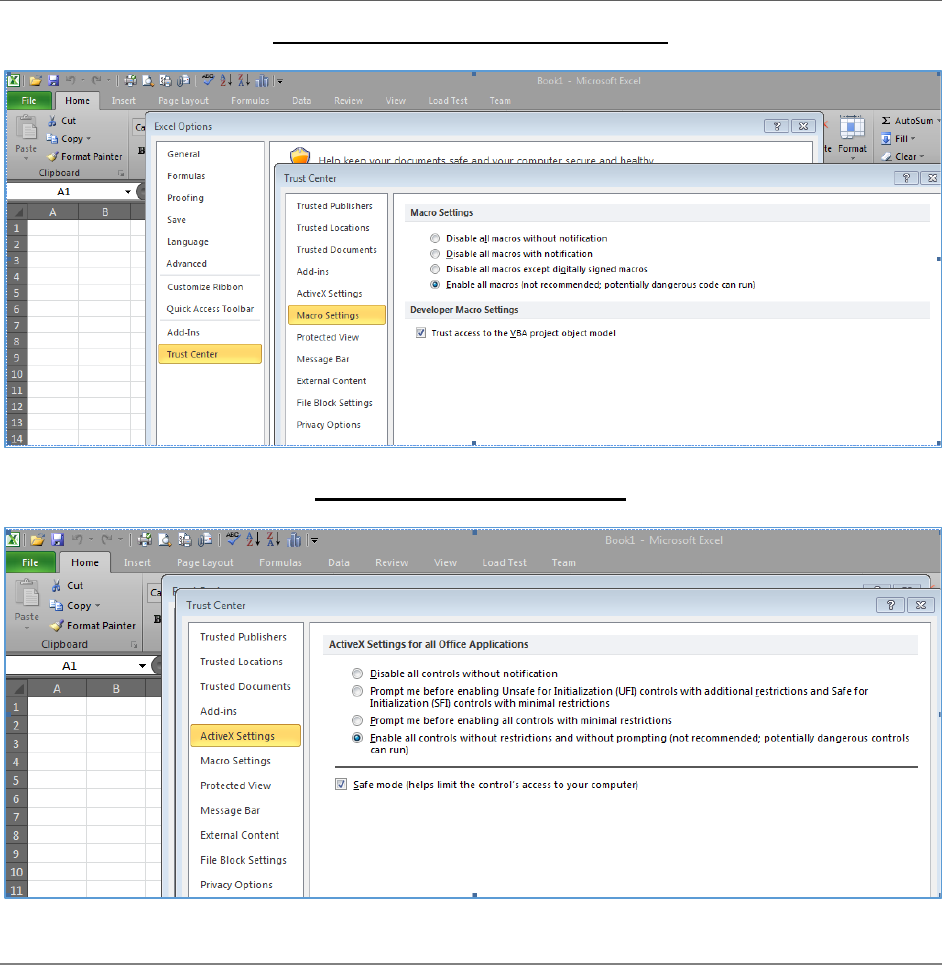
4. Note: Please work with your IT/IS department to ensure you have adequate permission to
configure the settings as shown and run macros in your environment.
o Go to > File > Options > Trust Center > Trust Center Settings > Macro Settings.
Select settings as shown in Figure 4 - An Excel Macro Settings.
CY2021 Bid Pricing Tool Technical Instructions
12
Figure 4 - An Excel Macro Settings
Figure 5 - Active X Settings
2.1.2.2 Version Compatibility
You will be able to open and work with multiple BPT files in the same Excel 2010 instance. If you
want to close a BPT file and open another one, you should also close Excel and open the next
BPT file in a new instance of Excel. There are known issues related to Excel 2010 when you
open a file in an existing Excel instance. If you encounter any issues when opening a BPT file,
then close Excel, go to the Task Manager, delete any other Excel processes, and then open a BPT
file in a new Excel window.
Working files for prior years (CY2019, CY2020) and CY2021 working files will NOT work
properly in the same Excel instance (i.e., window). You must open separate instances of Excel
in order to work with a CY2021 working BPT file and a CY2020 working BPT file at the same
time. That is, if you have a CY2020 workbook open, you must open another instance of Excel and
CY2021 Bid Pricing Tool Technical Instructions
13
then open the CY2021 file from within the new instance. You will be able to move between both
workbooks.
Note: It is not sufficient to close a CY2020 working BPT prior to opening a CY2021
workbook within the same instance of Excel. The CY2021 workbook MUST be opened in a
different instance of Excel by closing Excel before opening the CY2020 workbook. Otherwise
you will encounter a “subscript out of range” error. This error will disappear once you close the
CY2020 instance and re-open the CY2021 instance. See Figure 2.2.2-A.
You must open the working files for the same contract year in the same Excel instance; otherwise
you will receive an error message stating that the BPT Add-in file is read-only because it is already
open in another Excel instance.
Note: These restrictions only apply to working versions of BPT workbooks. You will be able to
open a read-only file, such as a finalized or backup file (CY2020 or CY2019) and a working file
(CY2020 or CY2021) in the same Excel instance.
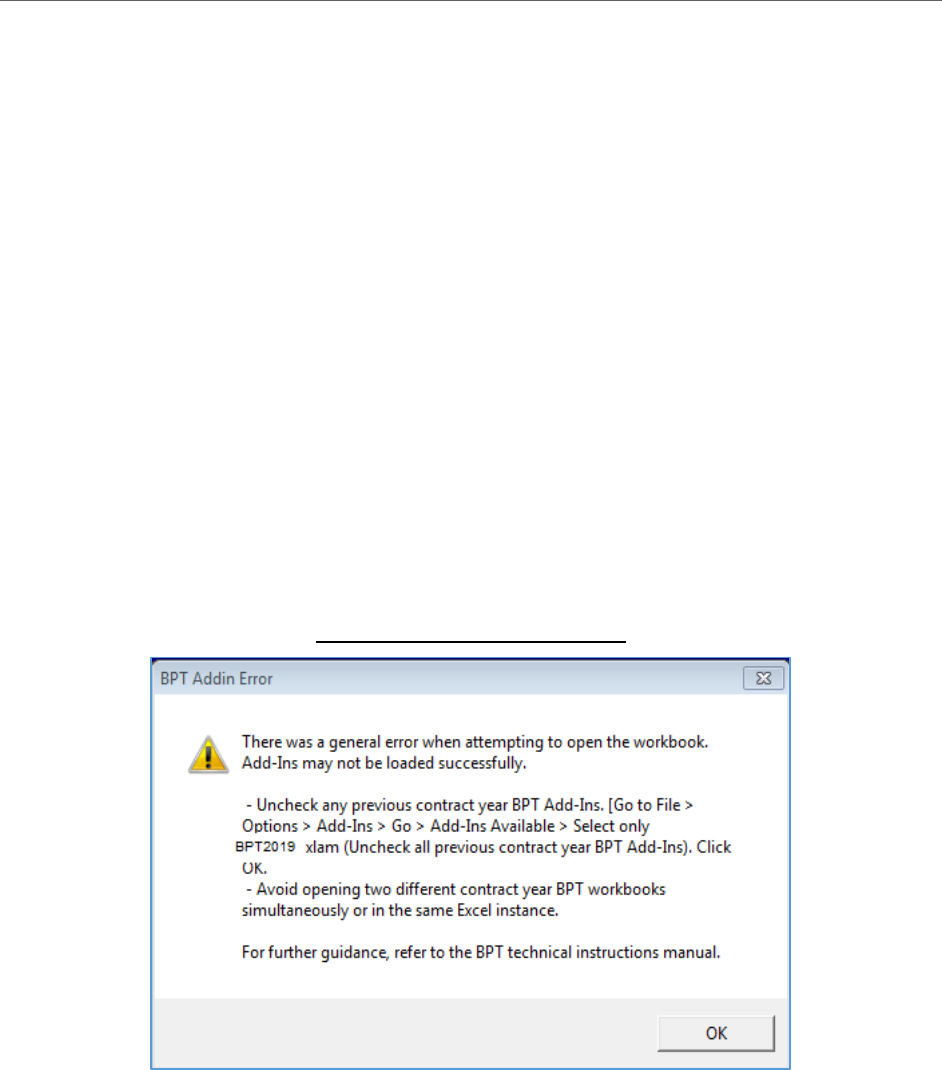
For returning BPT users (e.g., those that used the CY2020 BPT), you may receive the following
error message upon opening the CY2021 BPT for the first time you access the CY2021 BPT. See
Figure 6 - BPT Add-in Error.
Figure 6 - BPT Add-in Error
If this error occurs, select file menu > Options > Add-Ins > Manage: Excel Add-Ins then click
“Go”. In the Add-Ins dialog box, un-check the “BPT2020” and select BPT2019 and click “Ok”.
This will resolve the error when opening the CY2021 BPT thereafter.
For further help with errors when opening the BPT files, see 4.0 Troubleshooting and FAQ.

CY2021 Bid Pricing Tool Technical Instructions
14
2.1.2.3 Data Pre-population
When you use PBP software to download the BPT workbooks, the download process automatically
populates (or pre-populates) some of the workbooks’ “General Information” sections (Worksheet
1, Section I) from the PBP. (The “General Information” entered in Worksheet 1 appears in the
header sections of all the other worksheets in the BPT workbooks.) Pre-population, however,
occurs only once. If pre-populated information in the header section is inaccurate, you can
manually update the data in the BPT. The yellow highlighted cells in the header section of
Worksheet 1 are unprotected to allow you to change values if necessary.
Note: After the data pre-population, any information updated on the HPMS website or PBP will
not be automatically reflected in the BPT. You must update the BPT manually to maintain data
consistency.
If you download a blank BPT directly from HPMS, the “General Information” section will be
blank. It is recommended that you enter this information before entering other data.
2.1.2.4 BPT Commands
Upon successfully opening a working BPT with the macros enabled, ten BPT-specific icons will
appear in the Add-Ins tab. These icons are only available if the Add-Ins is enabled. If you reset the
Add-Ins to its default setting, the BPT icons will disappear and you must close the workbook and
reopen to restore them. Clicking on the BPT icons triggers some of the workbooks’ special BPT-
specific commands. You can also invoke these commands from the File menu or using the
following short-cut key combinations. See Figure 7 - Add-in Menu Functions.
For Excel 2010, these functions are located in the Add-In menu on the Toolbar.
Figure 7 - Add-in Menu Functions
Icon names (from left to right):
• Finalize BPT: Ctrl+Shift+S
• Circle Invalid: Ctrl+Shift+C
• BPT Refresh: Ctrl+Shift+R
• Validation Report: Ctrl+Shift+I
• Hide/Unhide Non-Validation Input Cell Label: Ctrl+Shift+L
• Hide/Unhide Rate Book(s): Ctrl+Shift+B
• Enable Protected Excel Functions: Ctrl+Shift+K
• Hide/Unhide Validation Cell Label: Ctrl+Shift+M
• Print Defined Worksheets: Ctrl+Shift+P

CY2021 Bid Pricing Tool Technical Instructions
15
• Hide/Unhide Formula Worksheet: Ctrl+Shift+H
2.1.3 Populating the BPT working file
BPT workbooks are the vehicles through which organizations present their plan bids to CMS.
Users populate working files by entering required data into specified data-entry fields, and the
workbook automatically calculates and displays the results in its calculated fields. (For details on
how the workbooks calculate results, see the CY2021 BPT Instructions for MA, PD, MSA and
ESRD-SNP workbooks located in HPMS.)
2.1.3.1 Data Entry and Cell Formats
Data entry fields are highlighted in yellow. For most fields, data entry follows Excel’s “General”
format, i.e., character input is stored as text and numerical input is stored as a number. The
following four fields, however, are numerical fields that the BPT ultimately stores as text.
• Plan ID
• Segment
• Region
• County Code
If data in these fields are entered as numbers, they will display as numbers until the workbook is
finalized. (Note: the finalization process (see 2.1.4.1
) must be successful for these changes to
occur.) To manually enter these fields as text, users should use a leading apostrophe (') and include
any leading zero’s when entering these values. (For example, to display 030 in the Plan ID field,
enter apostrophe, zero, three, zero.) When the “General Information” data is pre-populated from
the PBP (see 2.1.2.3), the formatting automatically inserts a leading apostrophe (') and displays the
leading zero’s in these fields.
If you copy and paste cells in any of the BPT worksheets, it is recommended that you use
Excel’s PASTE SPECIAL feature with the PASTE VALUES or PASTE FORMULAS
option. This will prevent overwriting a cell’s predefined format, which can occur when the
standard PASTE command is used. Also, do not use Excel’s “Cut” function in the BPT workbooks
as it will remove the cell’s predefined formatting.
Note: It is recommended that you use the Delete key instead of the Space bar to delete cell values
from the BPT.
2.1.3.2 Cell Validation
The yellow-highlighted data entry fields fall into three categories with respect to cell validation:
validation fields, critical validation fields, and non-validation fields. Validation fields have cell-
specific rules regarding the types and format of data that can be entered into them; the rules appear
in message boxes called cell labels when the cell is highlighted. Because some cell labels partially

CY2021 Bid Pricing Tool Technical Instructions
16
obstruct the user’s view of the cell, cell label displays can be turned off (see Section 2.1.3.5,
“Hide/Unhide Validation Cell Label”) or moved by clicking and dragging.
If cell validation rules are not followed, a red circle will appear around the cell. (See Section
2.1.3.3, “Circle Invalid.”) If the user edits the data in the cell to bring into compliance with the
rule, the red circle will disappear; however, this does not apply to linked cells. (See Section
2.1.3.10, “Enable Protected Excel Functions”). Users can view a list of all failed validations in a
workbook by running a Validation Report. (See Section 2.1.3.4, “Validation Report.”)
Critical validation fields are validation fields whose rules must be followed before the workbook
can be successfully finalized. (See Section 2.1.4.1, “Finalization Process.”) Critical validation
rules are different for each of the BPT workbooks; they are listed in Appendix A, “Critical Errors.”
Note: Some calculation fields are validation fields. Users cannot modify calculation cells. To
address failed validations in calculation fields, users must modify the data-entry cells to which the
calculation field formulas refer.
Non-validation fields are data-entry cells that have no validation rules to display. They do not
create red circles or messages in the Failed Validation Report.
If the worksheet is hidden, the cells that have validations in the hidden worksheets will not appear
in the Validation Report.
2.1.3.3 Circle Invalid
The Circle Invalid function identifies cells that may contain invalid data; it can be invoked by
clicking the Circle Invalid icon ( ) on the toolbar or by pressing Ctrl+Shift+C. This function
places a red circle around all failed validations in the workbook. If the user edits the data in a cell
to bring into compliance with the rule, the red circle will disappear; however, this does not apply
to linked data (See Section 2.1.3.10, “Enable Protected Excel Functions.”). The Circle Invalid
function executes automatically upon opening, saving and finalizing a BPT workbook.
Although red circles disappear when corrective data is manually entered into a cell, it is
recommended to click the Circle Invalid icon frequently to re-validate all the cells in the workbook.
2.1.3.4 Validation Report
The Validation Report function creates a new worksheet that lists all the failed validations in the
workbook; it can be invoked by clicking the Validation Report icon ( ) on the toolbar or by
pressing Ctrl+Shift+I. This function creates two reports: the Failed Validation Report and the
Active Cell Validation Report.
The Failed Validation report identifies, for every cell in the workbook with validation errors, the
worksheet name, cell location, cell value, input message and whether or not the error is a critical
error by indicating “PASSED” or “FAILED” in the Critical Error column (FAILED critical errors

CY2021 Bid Pricing Tool Technical Instructions
17
will prevent the workbook from finalizing). You cannot modify the report, but you can copy and
paste its contents into another document.
Note: Only critical errors will display “PASSED” or “FAILED” in the Critical Error column.
The Validation Report function will also trigger the Circle Invalid function. If you generate the
Validation Report, you will also generate the red circles in the workbooks.
The Active Cell Validation Report assists vision-impaired users who use a screen reader. It reports
the validation status (Passed, Failed or No Validation) for the active cell on which the cursor is
placed.
The Validation Report worksheet is hidden when you save, close, or finalize a BPT. You can re-
generate the report by re-invoking the function.
If a user enters data by linking to another Excel workbook, these links must be refreshed prior to
running the Validation Report. (See Section 2.1.3.9, “BPT Refresh.”)
2.1.3.5 Hide/Unhide Validation Cell Label
The Hide/Unhide Validation Cell label function turns off the cell labels (pop-up messages that
display a cell’s validation rules) for all validation cells, including input and calculated cells in the
workbook; it can be invoked by clicking the Hide/Unhide Validation Cell Label icon ( ) on the
toolbar or by pressing Ctrl+Shift+M. By default, cell labels are turned on for validation cells.
Note: This function controls turning on and off input messages for validation cells only. The cells
that do not have validations cell label input messages are controlled by the Hide/Unhide Non-
Validation Input Cell Label function. (See section 2.1.3.6 “Hide/Unhide Non-Validation Input Cell
Label function.”)
2.1.3.6 Hide/Unhide Non-Validation Input Cell Label
The Hide/Unhide Non-Validation Input Cell Label function turns on the automatic display of cell
labels for non-validation cells, which enables screen readers to read the contents of the cell label’s
message; it can be invoked by clicking the Hide/unhide Non-Validation Input Cell Label icon (
) on the toolbar or by pressing Ctrl+Shift+L. All cells that do not have validations will display
a pop-up input message with the cell location and cell label. When you click on a cell, the screen
reader will read the cell’s message which indicates whether the cell is an input cell. For example,
if this function is invoked and the user clicks on cell G27 in Worksheet 1 of the MA BPT
(MA1.III.a (g)), the following message will be read by the screen reader: “G27 Input Cell
Annualized Utilization/1000 for Inpatient Facility”. By default, non-validation cell messages do
not automatically appear when a BPT file is first opened.

CY2021 Bid Pricing Tool Technical Instructions
18
2.1.3.7 Hide/Unhide Rate Book(s)
The Hide/Unhide Rate Book(s) function allows you to hide or unhide the Rates worksheet (MA,
MSA, and ESRD-SNP BPTs) and the Statutory Rates worksheet (MA BPT only); it can be invoked
by clicking the Hide/Unhide Rate Book(s) icon ( ) on the toolbar or by pressing Ctrl+Shift+B.
These worksheets will be hidden in the finalized BPT file. You will be able to copy and paste the
data to another document prior to finalization.
2.1.3.8 Hide/Unhide Formula Worksheet
The Hide/Unhide Formula Worksheet function allows you to hide or unhide a worksheet which
displays the formulas for all formula cells in the BPT file (except for hidden formula cells); it can
be invoked by clicking the Hide/Unhide Formula Worksheet icon ( ) on the toolbar or by pressing
Ctrl+Shift+H. The Formula sheet is hidden by default and protected from user modification. These
worksheets will be hidden in the finalized BPT file.
2.1.3.9 BPT Refresh
The BPT Refresh function updates a BPT workbook’s links to other Excel workbooks; it can be
invoked by clicking on the BPT Refresh icon ( ) on the toolbar or by pressing Ctrl+Shift+R.
BPT Refresh automatically executes upon opening or saving a BPT workbook.
Data entered in some cells (independent cells) affects the status of other cells (dependent cells).
For example, if Plan Type is “RPPO,” then MA Region will be editable (and a drop-down menu
will appear); if Plan Type is other than “RPPO,” then MA region will not be editable (and “N/A”
will appear). If the value of Plan Type is entered in the workbook directly, the status of MA Region
will be updated whenever Plan Type is modified. However, if the value in Plan Type is linked to
an external Excel file and the external file is modified, BPT Refresh must be invoked in order to
update the status of MA Region.
The following list describes dependent fields—along with the independent fields they depend on—
that require BPT Refresh when links are involved as described above. (For further details about
the relationships between these fields, see the line-by-line instructions in the MA and PD BPT
Instructions.)
• Plan Type on MA Worksheet 1 Cell G7
ο If the Plan Type is RPPO, the MA Region field is editable; otherwise it is protected
and displays N/A.
ο If the Plan Type is RPPO, the MA Benchmark Plan Bid Component (W5, M17) is
editable; otherwise the field is protected and displays N/A.
ο If the Plan Type is RPPO, the Enrollee Type (W1, K5) is protected and displays
A/B.

CY2021 Bid Pricing Tool Technical Instructions
19
• MA-PD indicator on MA Worksheet 1 Cell G8 and Plan ID on Worksheet 1 D6
ο If Plan ID is less than 800 and MA-PD indicator is “No”, the MA Bid Summary
Plan Intention for target Part D basic premium (W6 R47) is protected and displays
a value of “N/A – MA only plan”), and any values in the cells are removed.
ο If Plan ID is less than 800 and the MA-PD indicator is “Yes”, MA W6 R47 contains
a drop-down list.
ο If Plan ID is greater than or equal to 800, MA W6 R47 will be protected and display
“N/A - EGWP bid”. Part D premium and rebate cells also become protected, and
any values in the cells are removed.
• Plan Type on PD Worksheet 1 Cell I6
ο If the Plan Type is PDP, cell F32 on PD Summary (w7) is editable and has a drop-
down list displaying values 0.10 and 0.50; for all other plan types, this cell is
protected and displays the value 0.10.
ο If the Plan Type is PDP, ED PDP or Fall Back, the Enrollee Type field (w1 I7) is
protected. Otherwise, this cell is editable.
• PD Benefit Type on PD Worksheet 1, N6
ο If the PD Benefit Type is EA, PD worksheet 4 is hidden;
ο If the PD Benefit Type is DS, both PD worksheet 4 and 5 are hidden;
ο If the PD Benefit Type is BA, PD worksheet 4 is hidden;
ο If the PD Benefit Type is AE, PD worksheet 5 is hidden.
ο If the PD Benefit Type is DS, PD worksheet 6 columns I, J, K in section II are
shaded and protected.
• Use of ISAR factor on MA Worksheet 5 Cell G31
ο If the ISAR factor is “Yes”, cells G39 to G3333 are editable; otherwise these cells
are protected.
• MA Plan ID on MA Worksheet 1 Cell D6
ο If the Plan ID is equal to or greater than 800, the employer PMPM input on
Worksheet 4, cell R116 is editable; otherwise it is protected.
ο If the Plan ID is greater than or equal to 800, the Overall Gain/(Loss) Margin Level
will be white, protected, and display “Contract.” Otherwise field is editable and

CY2021 Bid Pricing Tool Technical Instructions
20
displays a drop-down list with “Contract,” “Organization,” and “Parent
Organization.”
• Plan level In-Network OOP Max on MA Worksheet 3 Cell G12
ο If the OOP Max indicator G12 is ”Yes”, then H12 is editable; and when G12 is
”No” H12 is protected.
• Plan level Out-of-Network OOP Max on MA Worksheet 3 Cell J12
ο If the OOP Max indicator J12 is ”Yes”, then K12 is editable; and when J12 is
”No”, K12 is protected.
• Plan level Combined OOP Max on MA Worksheet 3 Cell M12
ο If the OOP Max indicator M12 is ”Yes”, then N12 is editable; and when M12 is
”No”, N12 is protected.
• SNP on MA Worksheet 1 K8 –
ο If the SNP indicator K8 is “Y”, then O8 is editable; and when K8 is “N”, O8 is
protected and displays “N/A.”
Note: The BPT Refresh does not run the BPT validation rules. Use the Circle Invalid function or
Validation Report function if you want to refresh the red-circle display.
2.1.3.10 Enable Protected Excel Functions
The Enable Protected Excel Functions function allows the user to access a list of Excel functions
(Change Link, Trace dependents, Trace precedents, Trace error and Remove all arrows) that are
disabled because the BPT worksheets are protected; these functions can be invoked using this BPT
feature.
You can invoke this function by clicking the Enable Protected Excel Functions icon ( ) on the
standard Excel toolbar or by pressing Ctrl+Shift+K. The system will then:
1. Display a toolbar under the standard toolbar, See Figure 8 - Protected Excel Functions
Toolbar:
Figure 8 - Protected Excel Functions Toolbar
2. Allow the user to click one of these icons to display the corresponding Excel screen for
that function.
You can click the Enable Protected Excel Functions icon ( ) again to hide this toolbar.
The Change Link function allows you to change the link source using the standard Excel Edit link
function. The Trace dependents, Trace precedents, Trace error and Remove all arrows functions

CY2021 Bid Pricing Tool Technical Instructions
21
are standard Excel functions used for formula auditing and cell tracing. Once enabled, these items
function as they do in a standard Excel workbook.
2.1.3.11 Print Defined Worksheets
The Print Defined Worksheets function allows you to print pre-defined worksheets in a BPT; it
can be invoked by clicking the Print Defined Worksheets icon ( ) on the Toolbar or by
pressing Ctrl+Shift+P. The pre-defined worksheets are:
• MA - Worksheets 1, 2, 3, 4, 6 and the first page of worksheet 5
• PD - All visible worksheets (which varies based on benefit type)
• MSA - Worksheets 1, 2, 4 and the first page of worksheet 3
• ESRD-SNP – Worksheets 2, 3, and the first page of worksheet 1
Note: This function does not print the validation report; it can be printed manually.
2.1.3.12 MA, MSA, and ESRD-SNP County Code Section
County Codes are entered in the following workbook sections:
• MA worksheet 5, rows 39 to 3333 columns B through U
• MSA worksheet 3, rows 39 to 3333 columns B through H
• ESRD-SNP worksheet 1, rows 21-320 columns A through I
The following macro functions are applicable to these sections:
1. The MA and MSA workbooks support up to 3,295 lines of county codes. The ESRD-SNP
workbook supports 300 lines of county codes.
2. County codes must be entered in consecutive rows starting with row 39 (row 21 for the
ESRD-SNP workbook). Row 39 contains the formulas in a blank BPT.
3. All county codes in Column B for both MA and MSA workbooks and Column A for
the ESRD-SNP workbook must be entered as a 5 digit number preceded by an
apostrophe ('). (See Section 2.1.3.1, “Data Entry and Cell Formats.”) “#N/A” errors
appear if values are entered incorrectly. You cannot successfully finalize a file if there are
errors in the county code field. You must correct these errors to finalize the BPT.
4. When a county code is entered in column B (column A in the ESRD-SNP workbook), the
macros automatically populate formulas in the following cells:
a. Columns C, D and H in the MA workbook.
b. Columns C, D, G, and H in the MSA workbook.
c. Columns B and G in the ESRD-SNP workbook.

CY2021 Bid Pricing Tool Technical Instructions
22
Note: F must be entered into the ESRD Status column (D) in the ESRD-SNP workbook for the
County Name column (C) to populate with County Name data. A valid county code must be
populated in column A for this to be applicable.
5. When a county code is deleted from column B (column A in the ESRD-SNP workbook),
the macro removes the automatically populated formulas in the cells described above.
6. All county codes are sorted in the finalized file in descending order. (See Section 2.1.4.1,
“Finalization Process.”)
7. If the county codes are imported as a batch from another tool and they include spaces or
special characters, these spaces and special characters are sorted as non-blank rows. As a
result, you may see some blank lines in the finalized file at the top of the county code
section. Open the working files, remove these lines, and re-finalize the BPT.
8. For each row in the MA, MSA, and ESRD-SNP County Code sections ([MA5.VI.3],
[MSA3.III.2],and [ESRD-SNP1.II] respectively), these conditions must be met for
finalization to be successful:
a. If there is a non-zero value in the Projected Member Months field (column E), then
there must be non-zero values in the County Code field (column B for MA and
MSA, column A for ESRD-SNP) and the Projected Risk Factor field (column F)
for the corresponding row.
b. If there is a non-zero value in the Projected Risk Factors field (column F), there
must be a non-zero number in the County Code field (column B for MA and MSA,
column A for ESRD-SNP) in the corresponding row.
2.1.3.13 Undo Function
The BPT supports the Excel undo functionality with some exceptions. Modifying any of the cells
listed below cause the actions/states stored in your undo history to be deleted. This means that
after entering, changing, or deleting a value in any of the following cells, you cannot undo your
previous actions.
• Plan Type
• MA-PD indicator
• PD Benefit Type
• Use of ISAR factor
• County Codes
• Any cell with a drop-down box
• Any cell that has a validation error removed due to a correction in the user entered data
A new undo history begins to compile after each of these cells are modified.
2.1.3.14 Save Functions
There are two save processes available within the BPT: a non-finalized and a finalized save.

CY2021 Bid Pricing Tool Technical Instructions
23
A non-finalized save can be invoked by clicking on the Excel Save icon on the Quick Access
toolbar or by selecting File and then save from the Excel menu. This save process saves any
changes you have made to the BPT workbook.
A finalized save occurs when the “Finalize BPT” function is invoked (See Section 2.1.4,
“Finalizing the BPT for Submission”). This step is taken when the workbook is complete and ready
for upload to HPMS.
2.1.4 Finalizing the BPT for submission
The Finalize BPT function prepares the workbook for submission to HPMS; it can be invoked by
clicking the Finalize BPT icon ( ) on the toolbar or by pressing Ctrl+Shift+S. You must finalize
your workbooks before packaging them with the PBP data for upload to HPMS.
Before you finalize a BPT file, do the following:
1. If you have the Latest add-in, please ensure that it is disabled prior to finalization of
the BPT
2. Click the Validation Report or Circle Invalid function to check for any critical
errors. If critical errors are not corrected, you will receive an error message and the BPT
file will not finalize.
A validation report is included in finalized versions so that the user can view red circle
and failed validations after finalization.
2.1.4.1 Finalization Process
When the finalization function is triggered, the system performs the following actions:
• Recalculate the BPT working file.
Note: The Excel settings of the BPT include Automatic Calculation of formulas. Users
have the ability to change the BPT’s Excel settings, from Automatic Calculation to Manual
Calculation, by selecting Tools, Options, and Calculation. However, please note that when
a user attempts to finalize the BPT - even if the finalization is unsuccessful due to the
failure of critical validations – then the Excel settings of the BPT working file are changed
back to Automatic Calculation. The Automatic Calculation is reset during any attempted
finalization (whether successful or not).
• Check the required fields—certain fields (e.g., “Contract Number”) must be entered for
finalization to be successful; these fields are listed in Appendix B, “Required Fields”.
• Check the critical validations—critical validation fields must comply with their validation
rules for the finalization process to be successful; the fields are listed in Appendix A,
“Critical Errors”. To locate critical errors, create and view a Validation Report; the critical
errors display “PASSED” or “FAILED” in the Critical Error column. All critical errors
must be corrected for a file to be successfully finalized.

CY2021 Bid Pricing Tool Technical Instructions
24
• Save the working file.
• Create a backup file—this is a read-only file that contains the same data as the working
file; it can be used to restore data in a working file. (See Section 3.1.7, “Use the Backup
File to Restore a Prior Version of the BPT.”)
• Create an XML file – These files are created upon successful finalization of a BPT.
The XML filename will appear in the following format: Contract Number, Plan ID,
Segment ID, and Workbook Type.
o Example: H1234123001MA.xml
• The XML file is not to be modified after finalization of the BPT and must be uploaded
alongside the finalized BPT .xlsx file of the same name.
• Create a finalized file with the following features:
ο Designated fields (Plan ID, Segment ID, Region, County Codes) are padded with
a leading apostrophe and leading zero’s to display the required number of digits For
example, if you entered 2 for Plan ID, the finalized file contains ‘002 (See Section
2.1.3.1, “Data Entry and Cell Formats”).
ο All PD worksheets display in the finalized file, but only the applicable worksheets
based on the PD Benefit type contain data. For example, if you selected BA as the
Benefit type, and entered data in PD Worksheet 5, and then later change the Benefit
type to AE, the data entered in Worksheet 5 will be deleted. (For further information
on which worksheets are applicable for which PD Benefit Types, see the Part D bid
instructions).
ο County Codes ([MA5.VI.3], [MSA3.III.2], and [ESD-SNP1.II) are sorted in
descending order. Note: The data in the working file and the backup file retains the
original (pre-sorted) order.
ο During finalization, a “timestamp” footnote is added within the finalized BPT.
(MA WS6 cell B57, PD WS7 cell B49, MSA WS4 CELL E69, ESRD-SNP WS2
cell A102)
ο Formulas are removed in the finalized file. Formulae in the working file and the
backup file remain.
ο PD Region [PD1.I.10] is saved as “N/A” in the finalized file if PD Region in the
working file is left blank. The region field in the working BPT remains blank.
ο Red circles display for cells that do not pass validation rules. Note: You can finalize
the file if the red circled cell is not one of the critical errors. A list of critical
validations for each workbook is in Appendix A, “Critical Errors.”
ο Rate sheets are hidden. In the working file you can still unhide the Rate sheets as
needed.

CY2021 Bid Pricing Tool Technical Instructions
25
ο A Validation Report is available for the user to view red circle and failed
validations.
ο The Working Text Box is removed from the finalized file (MA Worksheet 6 and
PD Worksheet 7) but remains in the working file and the backup file.
ο All data in H25:H64 and M25:M64 on MA Worksheet 3 will be removed during
the finalization process. Data will remain in the working and backup versions.
ο The finalized file only contains the BPT worksheets, the BPT Information Sheet
and the splash screen.
2.1.4.2 File Naming Convention
Finalized BPT workbooks are saved using the following standardized naming convention:
Contract ID+Plan ID+Segment ID+Workbook Type.xlsx. Use of this convention is a requirement
for a successful bid upload to the HPMS and enables the Plan Benefit Package software to validate
your bid submission file. //TODO
Example: H1234123001MA.xlsx
Note: Finalized files are saved in the same directory where the working file is located.
Backup files use the same naming convention as finalized files with a timestamp appended to the
end of the name: finalized filename +_“_Backup_”+YYYY-MM-DD-HHmmss.xlsm
Example: H1111001001MA_Backup_2021-5-20-100000.xlsm
Note: Back up files are saved in the same directory where the working file is located.
The working file name can be changed at any time. The finalized and backup BPTs are read-only
files. If you need to make additional changes prior to bid submission (i.e., prior to upload to
HPMS), modify the working file and finalize the BPT again; the previous finalized file will be
overwritten. A new backup file will be created; backup files will not be overwritten (as they are
time-stamped). (For guidance on using backup files to recover saved data, see Section 3.1.7, “How
to use the backup file to restore a prior version of the BPT.”)
2.1.5 Closing the File
When you exit a BPT file by closing the workbook or by closing Excel, the system will check to
see if any changes have been made since the last save. If there have been no changes, the file will
close. If there have been changes made since the last save, you will receive the following message
prompt: “Any unsaved information will be lost. Would you like to save the changes to your
<filename>?” If you click—
Yes—the BPT file will be saved and closed.
No—the BPT file will be closed without saving changes.
Cancel—the pop-up message disappears and the file will not be closed nor saved.

CY2021 Bid Pricing Tool Technical Instructions
26
2.1.6 Password Protection
The BPT is password protected. You may not modify the structure of the BPT workbooks or
worksheets. Each data item must be located in its pre-defined cell location for successful
processing by the HPMS.
Tampering with the BPT protection, including but not limited to un-protecting and re-
protecting any parts of a BPT workbook will permanently compromise the file and prevent
successful finalization of that BPT workbook.
If a workbook is compromised in this way, you must discard the compromised BPT, download
and complete a new BPT.
2.1.7 Print Functionality
The workbooks contain a BPT-specific Print button that will print a pre-defined set of worksheets
(with print areas and page setups pre-designated). (See Section 2.1.3.11, “Print Defined
Worksheets.”)
The standard Excel Print function (select File then Print) will print the current worksheet using the
BPT-designated print areas and page setups. Multiple worksheets may be printed by clicking
multiple tabs while holding down the Ctrl key or the Shift key) and then invoking the standard
Excel Print function.
To bypass the BPT-designated print areas and page setup, set these parameters as you would in
Excel and then invoke the standard Excel Print function.
2.1.8 New Releases
If necessary, the Centers for Medicare and Medicaid Services may deploy a new version of the
BPT Add-in file to update the BPT workbooks. The new version will be made available to the user
community through HPMS. HPMS will send an auto-generated email to certain HPMS users to
announce that a new BPT Add-in is available for download from HPMS.
If CMS deploys an updated version of the BPT Add-in (BPT2021.xlam) file, you must download
this file from the HPMS website. You must overwrite the existing BPT Add-in with the most
current version in the C:\BPT\BPT2021 folder. If you saved multiple versions of the BPT Add-
in to the BPT2021 folder or elsewhere on your personal computer (PC), you may experience
technical difficulties with the BPT.
Note: If you receive the BPT add-in file via email and it is saved to your temporary directory as
part of the email download process, you must delete it from the temporary directory.
To verify that the BPT workbooks are using the latest version of the Add-in file, compare the
version number given during the add-in download process to the version number in the upper right
corner of Worksheet 1 of the BPT (e.g., “MA-2021.4” indicates that the BPT is using version 4 of
the add-in).

CY2021 Bid Pricing Tool Technical Instructions
27
You will need to update all of your BPT workbooks (MA, PD, MSA, and ESRD-SNP) with the
latest BPT add-in file. If you have finalized a BPT with an old version of the add-in file but not
yet uploaded it, you must download the new Add-in file, update the working file, and re-finalize
the BPT.
The BPT workbook is updated automatically when first opened after downloading the new BPT
Add-in file. When you receive a pop-up message stating that the BPT is out of date, click “OK”
and the update process will begin. As part of the update process, a backup version of your previous
BPT will be saved to a C:\BPT\BPT2021\Update Backup VersionX folder, where X is the Add-in
file version number.
You will not need to transfer any data from one workbook to another to apply a BPT Add-in
update. For step-by-step instructions on downloading an add-in file update, see Section 8, “How
to Update the BPT Add-In” and Section 3.1.4, “How to Update the Add-In for Multiple BPT
Workbooks using the Batch Tool.”
2.1.9 Batch Process Tool
The Batch Process Tool is supported in Excel 2010, 2013, and 2016 (32-bit or 64-bit). Note: In
CY2022, the Batch Tool will no longer be supported in Excel 2010.
A Batch Process Tool is available to assist you with updating, finalizing and checking validation
errors for multiple BPT workbooks. The estimated execution time for the process can vary greatly
based on your PC’s processing power, the number of workbooks in the batch, the size of each
workbook (e.g., MA workbooks with a large number of county codes may experience slower
execution time). It is recommended that you initially run a small batch (e.g., five to ten workbooks)
to assess the execution time specific to your PC. The Batch Process Tool is available for download
from the HPMS Bid Submission module. You must close all BPT workbooks before running
the batch process. During the batch process an Excel file may open during executions. Do not
attempt to close, alter or edit the Excel file until the batch completes its function. Doing so could
result in errors while processing the selected batch function. After the batch process is completed,
close the Batch Process Tool and any open Excel files before opening a stand-alone BPT file (to
avoid potential conflicts between the files).
Note: You must have Excel 2010, 2013, or 2016 installed to use the Batch Process Tool. Reports
will be generated in the .xlsx format.
All batch processes will skip (i.e., will not process) the following files if they are selected:
• Non-BPT Excel workbook
• Backup BPT file
• Finalized version of BPT
• Working BPT with different contract year (e.g., CY2019 working file)

CY2021 Bid Pricing Tool Technical Instructions
28
Before using the Batch Process Tool, make sure the following boxes are checked: “Trust all
installed Add-ins and templates” and “Trust access to Visual Basic Project.” (Open Excel and
select Tools, Macros, Security, and click on the Trusted Publishers tab.)
Note: The Batch Process Tool will set the BPT Calculation flag (click Tools, Options, and the
Calculation tab) to “Automatic.” To choose a different setting (after the batch process
completes), open a stand-alone BPT workbook and manually change the setting.
2.1.9.1 Batch Validation Report
This function will generate validation reports for one or more BPT files. To enable this function,
launch the Batch Process Tool, select “Validation Report,” and click “Next.” See Figure 9 - Batch
Tool Validation Report. Select the BPT files (with file extension .xlsm) to be processed. The
Batch Process Tool will disable all icons that may disrupt its execution. The execution status of
the batch process will be displayed in the Batch Process Tool status window. A success or failure
message is displayed for each of the BPT workbooks. At the end of the process, you will receive
a message confirming the number of files that passed, failed or were not processed. The report will
be saved in the same folder from which the BPT files were selected. For Excel 2010, the report is
saved in the .xlsx format. The report’s Index Page lists the filenames, Contract IDs, Plan IDs, and
Segment IDs associated with the report. A hyperlink next to each file will take you to the
corresponding report worksheet.
Figure 9 - Batch Tool Validation Report
Note: If the BPT files selected to be processed were created with an older Add-in file version
than the batch process uses, the files will be updated first before being processed by the
batch. (See Section 2.1.9.2, “Batch Update Process.”)
CY2021 Bid Pricing Tool Technical Instructions
29
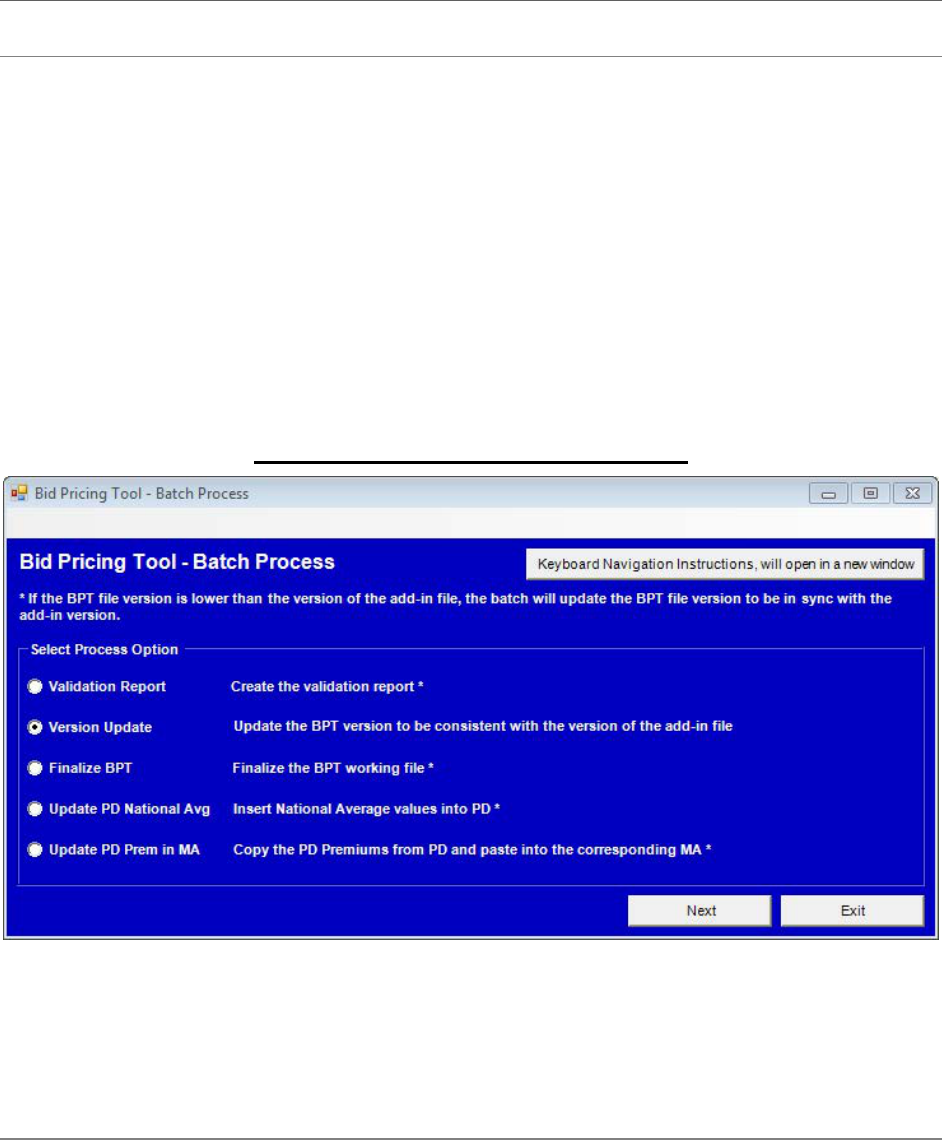
2.1.9.2 Batch Update Process
If a new version of the BPT Add-in is downloaded from HPMS, the Batch Process Tool will allow
you to update all of your working BPT files to the latest BPT add-in version. To enable this
function, launch the Batch Process Tool, select the “Version Update” option, and then click
“Next.” See Figure 10 - Batch Tool Version Update. Select the BPT files (with file extension
.xlsm) to be updated with the new version of the BPT add-in, and then click “Update” to start the
batch process. The Batch Process Tool will disable all icons that may disrupt its execution. The
execution status of the batch process will be displayed in the Batch Process Tool status window.
A success or failure message is displayed for each of the BPT workbooks. If any updates fail, an
associated error message will be displayed. When the process is complete, you will receive a
message indicating the number of files that passed, failed or were not processed. The updated files
will be saved in the same folder from which they were selected. (For further instructions, see
Section 3.1.4, “How to Update the Add-In for Multiple BPT Workbooks Using the Batch Tool.”)
Figure 10 - Batch Tool Version Update
To verify that the BPT workbooks are using the latest version of the Add-in file, compare the
version number given during the add-in download process to the version number in the upper right
corner of the BPT worksheets (e.g., “MA-2021.1” indicates that the BPT is using version 1 of the
Add-in).
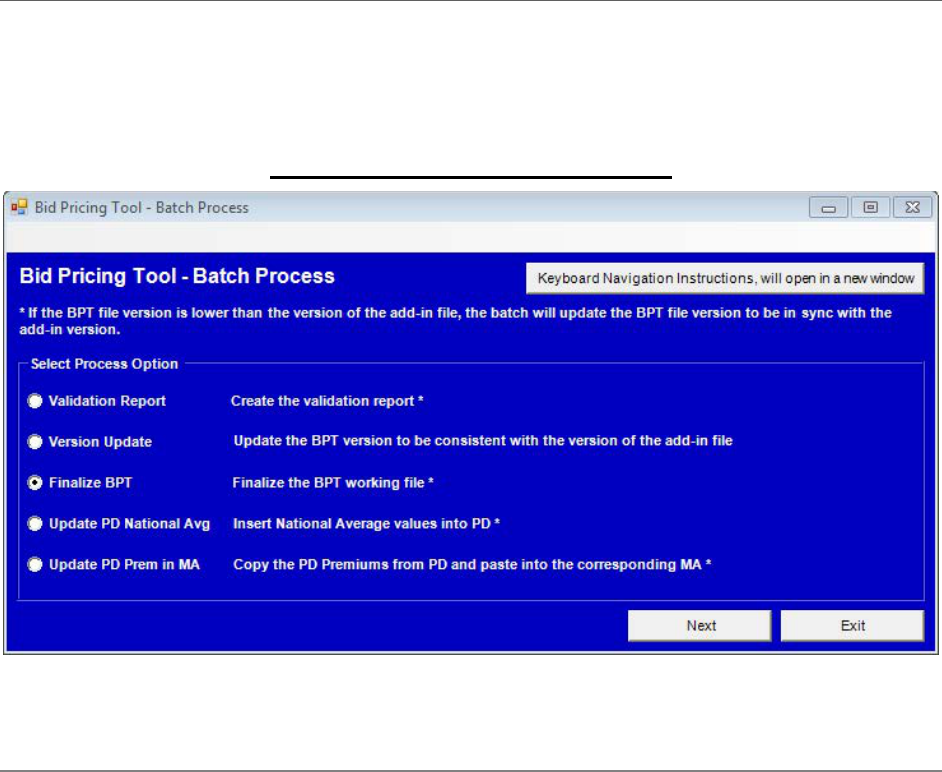
2.1.9.3 Batch Finalize Process
You can use the Batch Process Tool to finalize multiple BPT workbooks. Launch the Batch Process
Tool, select “Finalize BPT,” and then select the BPT files (with file extension .xlsm) to be
finalized; click “Finalize” to start the batch process. During the process, the execution status will
display in the Batch Process Tool status window. The Batch Process Tool will disable all icons
that may disrupt its execution. A success or failure message will display for each of the workbooks
CY2021 Bid Pricing Tool Technical Instructions
30
processed, and an error message will display for each workbook that fails finalization. When the
process is complete, you will receive a message indicating the number of files that passed, failed
or were not processed. The finalized files will be saved in the same folder from which they were
selected.
Figure 11 - Batch Tool Finalize BPT
Note: If the BPT files selected to be finalized are at a lower version of the add-in file, the files
will be updated first and then finalized.
2.1.9.4 Batch Update PD National Average Process
You can use the Batch Process Tool to update the PD “National Average Monthly Bid Amount”
[PD7.III.2] in multiple PD workbooks. Launch the Batch Process Tool and select the “Update PD
National Average” option. See Figure 12 - Batch Tool Update PD National Avg. In the two input
fields, enter the “National Average Monthly Bid Amount” [PD7.III.2] and the “Base Beneficiary
Premium” [PD7.III.3] and then select the PD BPT files (with file extension .xlsm) to be updated;
click the “Update National Avg” button to start the batch process. During batch processing, the
system will write the two input values into the selected PD files.

CY2021 Bid Pricing Tool Technical Instructions
31
Figure 12 - Batch Tool Update PD National Avg
The Batch Process Tool will disable all icons that may disrupt its execution. The execution status
of the batch process will be displayed in the Batch Process Tool status window. A success or failure
message is displayed for each of the BPT workbooks. If any workbooks fail to be finalized, an
associated error message will display. When the process is complete, you will receive a message
indicating the number of files that passed, failed or were not processed.
A report will be generated and saved in the same folder from which the PD files were selected. In
Excel 2010, the report will be generated in the .xlsx format. In the report, you will see the file
names for all files that were successfully updated. The report will also display the “Basic Part D
Premiums, Rounded” [PD7.III.5] before and after the updates for each workbook.
This batch process will ignore the following files if selected:
• Non-BPT Excel workbook
• MA, MSA and ESRD-SNP workbook types
• Backup BPT file
• Finalized BPT file
• Working BPT with different contract year (e.g., CY2019 working file)
• PD workbooks with blank Contract Number, Plan ID values.
The report will list ignored files in the section titled, “The following files were not updated
because they are not valid CY2021 PD files or contain blank Contract and Plan IDs”.
CY2021 Bid Pricing Tool Technical Instructions
32
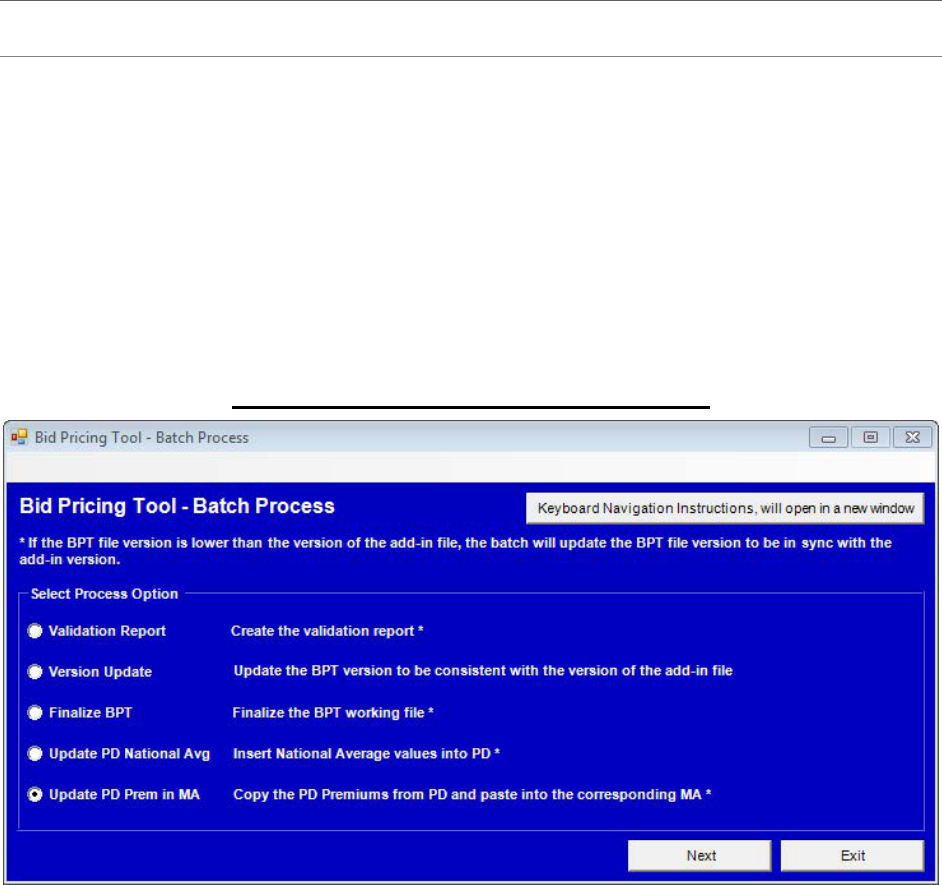
2.1.9.5 Batch Update MA BPT with PD Premiums
You can use the Batch Process Tool to copy the Basic and Supplemental Rounded PD Premiums
([PD7.III.5] and [PD7.III.7], respectively) from multiple PD workbooks into the corresponding
MA workbooks with the same Contract-Plan-Segment IDs ([MA6.III.C.7a] and [MA6.III.C.8a],
respectively). To do this, launch the Batch Process Tool, select “Update MA with PD Premiums,”
and then select the PD workbooks to be used in the update. See Figure 13 - Batch Tool Update
Prem in MA. On the bottom file selection window, select the MA workbooks that you want to
update with the PD premiums. Click the “Update MA with PD Premiums” button to start the batch
process. The batch process will copy premium values from the PD workbook(s) into the
corresponding MA workbook (i.e., the MA file with the same Contract Number, Plan ID and
Segment ID).
Figure 13 - Batch Tool Update Prem in MA
The Batch Process Tool will disable all icons that may disrupt its execution. The execution status
of the batch process will be displayed in the Batch Process Tool status window. A success or failure
message is displayed for each of the BPT workbooks. If any workbooks fail to be finalized, an
associated error message will display. When the process is complete, you will receive a message
indicating the number of files that passed, failed or were not processed.
A report will be generated and saved in the same folder from which the MA files were selected. In
Excel 2010, the report will be generated in the .xlsx format. The report will list the PD
workbooks—and the corresponding MA workbooks—that were successfully updated. In each
processed MA workbook, you will see the PD Premium values ([MA6.III.C.7a] and
[MA6.III.C.8a]) both before and after the updates. Duplicate MA workbooks (i.e., one with the
same Contract, Plan and Segment ID as another MA workbook) will also be updated with the PD
premiums and displayed in the top section of the report. The following files will be ignored by this
process:

CY2021 Bid Pricing Tool Technical Instructions
33
• Duplicate PD workbooks (i.e., one with the same Contract, Plan, and Segment ID as
another PD workbook that has already been processed) will not be processed and will be
displayed in the report under the section titled: “The following PD files were not processed
because they are a duplicate to a processed PD file”. That is, the PD premiums in the
duplicate PD BPT will not be copied into the corresponding MA BPT via the Batch Process
Tool.
• MA workbooks that do not match any selected PD workbooks (based on Contract Number,
Plan ID and Segment ID) will not be processed and will be displayed in the section titled:
“The following MA files were not matched to the selected PD source files”. That is, the
PD premiums in the MA BPT will not be updated / changed during the batch process.
• PD workbooks that do not match any selected MA workbooks (based on Contract Number,
Plan ID and Segment ID), will not be processed and will be displayed in the section titled:
“The following PD files were not matched to the selected MA target files”. That is, the PD
premiums in the PD workbook will not be copied into any MA workbooks during the batch
process.
The system will also ignore the following files; they will be reported in the section titled: “The
following files were not processed because they are not valid CY2021 MA or PD files”:
• Non-BPT Excel workbooks
• MSA and ESRD-SNP workbooks
• Backup BPT files
• Finalized BPT files
• Working BPT files with different contract year (e.g., CY2019 working files)
• MA or PD workbooks with blank Contract Number, or Plan ID values.
2.1.9.6 Batch Process Termination Handling
If the Batch Process Tool is terminated abnormally before the process is completed, you must close
all Excel instances (i.e., windows) before you re-run the batch process. (See Section 3.1.8, “How
to re-start the Batch process if it is abnormally terminated” for detailed instructions)
2.1.10 Accessibility Features
The Bid Pricing Tool provides features that allow you to work with BPT files using a keyboard
and screen reader. See details in the sections below for features applicable to the workbooks and
the Batch Process Tool.
2.1.10.1 Workbook Accessibility Features
The following are accessibility features available for the BPT workbooks:

CY2021 Bid Pricing Tool Technical Instructions
34
• Default location for active cursor upon opening a workbook – The active cursor is located
in the worksheet’s title cell (MA W1 B2, PD W1 B2, MSA W1 B2, and ESRD-SNP W1
A1). This allows you to have the same starting point every time the document is opened.
It also allows screen reader users to know the worksheet title information upon opening a
BPT file.
• Tabbing through active input cells – While using a working BPT file, you can use the
Tab key to navigate directly to the editable input cells (yellow-shaded cells).
• BPT-specific functions – Alternative text and shortcut keys are available for you to
access the specific functions available in the standard Excel toolbar. See Section 2.1.2.4
for more information.
• Validation Report – The validation report lists all failed validations. It allows you to use
the screen reader to access failed validation information without relying on the red circles
displayed on the workbooks. See Section 2.1.3.4 for more information.
• Hide/Unhide Non-Validation Input Cell Label – This function assists vision-impaired
users who use screen readers when working with BPTs. It allows you to turn on or off the
input cell labels (input messages that display the cell labels) for all non-validation cells.
See Section 2.1.3.6 for more information.
• Hide/Unhide Validation Cell Label - This function assists vision-impaired users who use
screen readers when accessing validation cells, including both input cells and protected
formulae cells. It allows you to turn on or off the input cell labels (input messages that
display the validation rules) for all validation cells. See Section 2.1.3.5 for more
information.
• Hide/Unhide Formula Worksheet – This function assists vision-impaired users who use
screen readers when accessing cell formulae. It allows you to hide or unhide a worksheet
that displays formulae for all formula cells. See Section 2.1.3.8 for more information.
2.1.10.2 Batch Process Tool Accessibility Features
The following are the accessibility features available for the Batch Process Tool:
• When you first open the Batch Process Tool, the cursor defaults to the Keyboard
Navigation Instructions button, which displays instructions about navigating throughout
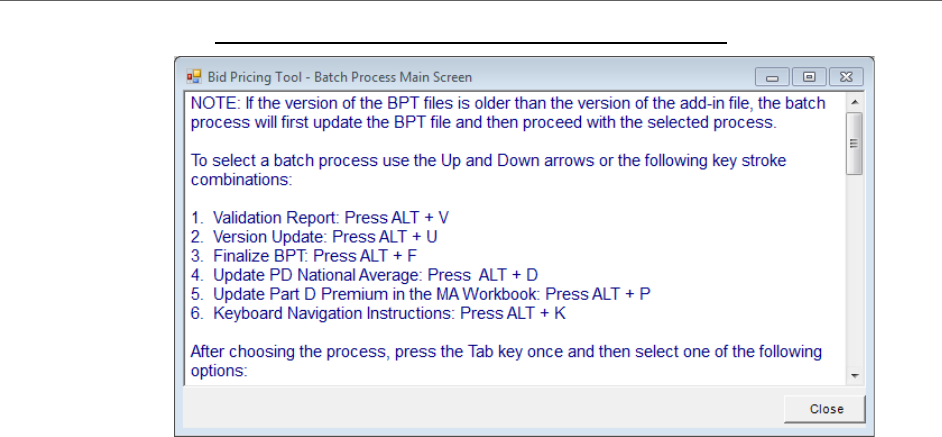
the application using the keyboard. See Figure 14 - Keyboard Navigation Instructions.
• The Keyboard Navigation Instructions contain the following information:
NOTE: If the version of the BPT file is older than the version of the Add-in
(BPT2021.xlam) file, the batch process will first update the BPT file and then
proceed with the selected process.
CY2021 Bid Pricing Tool Technical Instructions
35
Figure 14 - Keyboard Navigation Instructions
To select a batch process, use the Up and Down arrows or the following key stroke
combinations:
1. Validation Report: Press ALT + V
2. Version Update: Press ALT + U
3. Finalize BPT: Press ALT + F
4. Update PD National Average: Press ALT + D
5. Update Part D Premium in the MA Workbook: Press ALT + P
6. Keyboard Navigation Instructions: Press ALT + K
After choosing the process, press the Tab key once and then select one of the following
options:
1. To go to the next window for the process selected, press ALT + N
2. To exit the tool, press ALT + X
If the Next option is chosen, the next window will default the cursor on the Keyboard
Navigation Instructions. To execute the process for the target file or files, conduct the
following steps:
1. Press the Tab key twice to focus on the Select Folder section
a. For the PD National Average process
i. Press the Tab key once to populate the National Average Monthly
Bid Amount
ii. Press the Tab key once again to populate the Base Beneficiary
Premium
iii. Press the Tab key once again to focus on the Select Folder section

CY2021 Bid Pricing Tool Technical Instructions
36
b. For the Update MA with PD Premiums process
i. Press the Tab key twice to focus on the PD Select Folder section
ii. Use the Up and Down arrows and the Enter key to navigate to the
target parent and subfolder
iii. Press the Tab key once to focus on the Select File section
iv. Press the Tab key to select the file or files
v. Press the Tab key twice to focus on the MA Select Folder section
2. Use the Up and Down arrows and the Enter key to navigate to the target parent
and subfolder
3. Press the Tab key once to focus on the Select File section
a. Press the Tab key twice to return to the first screen of the tool
b. Press the Tab key three times to exit the tool
4. Select the file or files to be processed by using the Up and Down arrows and
pressing the Spacebar to highlight the file
5. Press the Tab key once and press the Enter key to execute the process
Once the process is complete, a dialog box will pop up and provide a summary of the
files that were successfully or unsuccessfully processed. To view the Debug log or
report, select “Yes.” To exit the dialog box, select “No.” Selecting “No,” will display
the recent process screen. At this point, the same process can be run by following the
steps above, another process can be run by pressing Alt + R, or the tool can be exited
by pressing Alt + E.

CY2021 Bid Pricing Tool Technical Instructions
37
3.0 How To…
3.1.1 Download a Blank Stand-alone BPT Workbook
1. Go to the HPMS Website and select Plan Bids > Bid Submission > CY 2021 > Download
Bid Sofware.
2. Select “BPT Add In & Spreadsheets”.
3. Read the instructions, select a workbook type radio button (MA, PD, MSA, ESRD-SNP),
and click ‘Download’.
4. When prompted to “Save” or “Run” the download file, choose “Save” and select a folder
in your directory.
3.1.2 Download and Launch the Batch Process Tool
1. Create a directory on your workstation to save the batch tool, e.g., C:\BPT\BATCH2021.
2. If you have previously downloaded the batch tool, remove the older version prior to
downloading the newer version by deleting any files in the chosen directory.
3. Go to the HPMS Website and select Plan Bids > Bid Submission > CY 2021 > Download
Bid Sofware.
4. Select “BPT Batch Tool”.
5. Click the ‘Download’ button.
6. When prompted with “Run”, “Save”, “Cancel” the file "BatchApplication.zip", choose
Save and select your chosen directory to save the file on your computer.
7. Double-click the left mouse button on the "BatchApplication.zip" file name to open the zip
file. Extract the files within the selected directory.
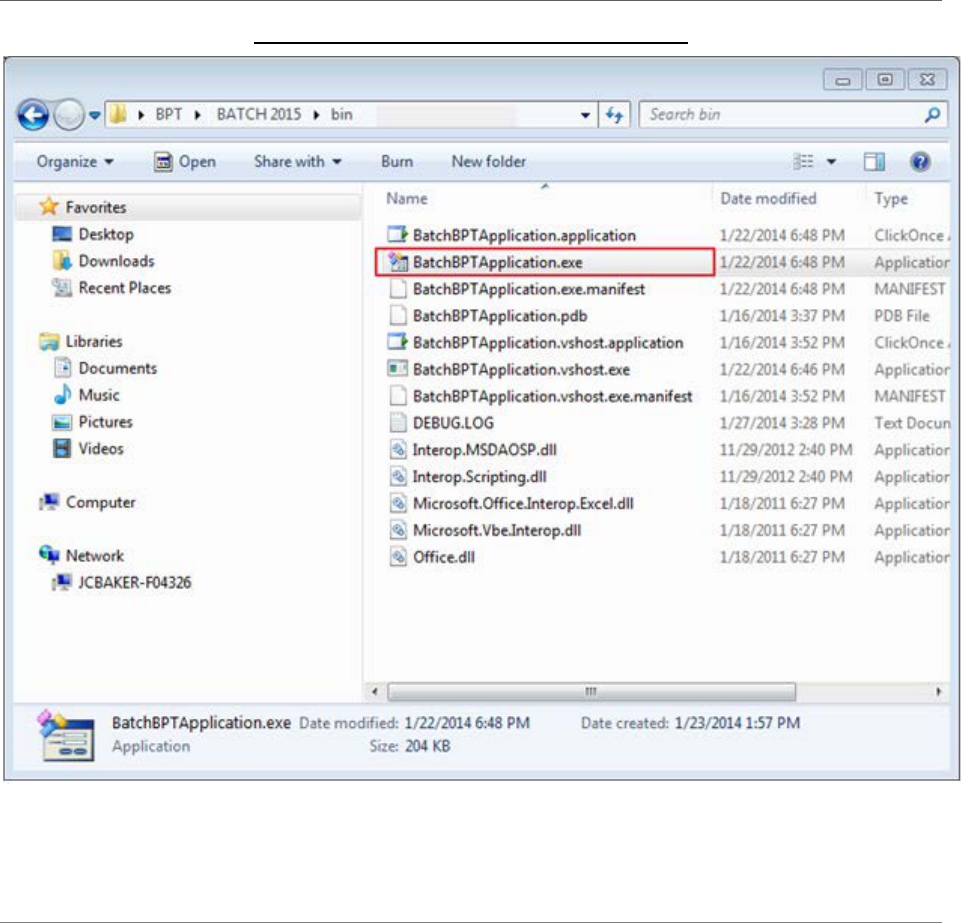
8. Double-click the left mouse button on "BatchBPTApplication.exe" file to launch the batch
application. Do not click on the other supporting files in the folder other than the
BatchBPTApplication.exe. See Figure 15 - Batch Tool Executable File.
CY2021 Bid Pricing Tool Technical Instructions
38
Figure 15 - Batch Tool Executable File
3.1.3 Update the BPT Add-In
1. In Windows Explorer, navigate to the C:\BPT\BPT2020 folder.
2. Delete the existing BPT2020.xlam file if applicable.
3. Go to the HPMS Website and select Plan Bids > Bid Submission > CY 2021 > Download
Bid Sofware.
4. Select “BPT Add-in & Spreadsheets”.
5. Read the instructions and click the ‘Download’ button to begin the process.
6. Save the file in the C:\BPT\BPT2021 folder.
7. Open a BPT and select “Enable Macros”. (This one is applicable only if Macro security is
set to “Disable all macros with notification”.)
CY2021 Bid Pricing Tool Technical Instructions
39
8. Click “OK” when you see the following message: “The current version of this BPT file is
version x. This is not the most update to date version. Updating to version y.”
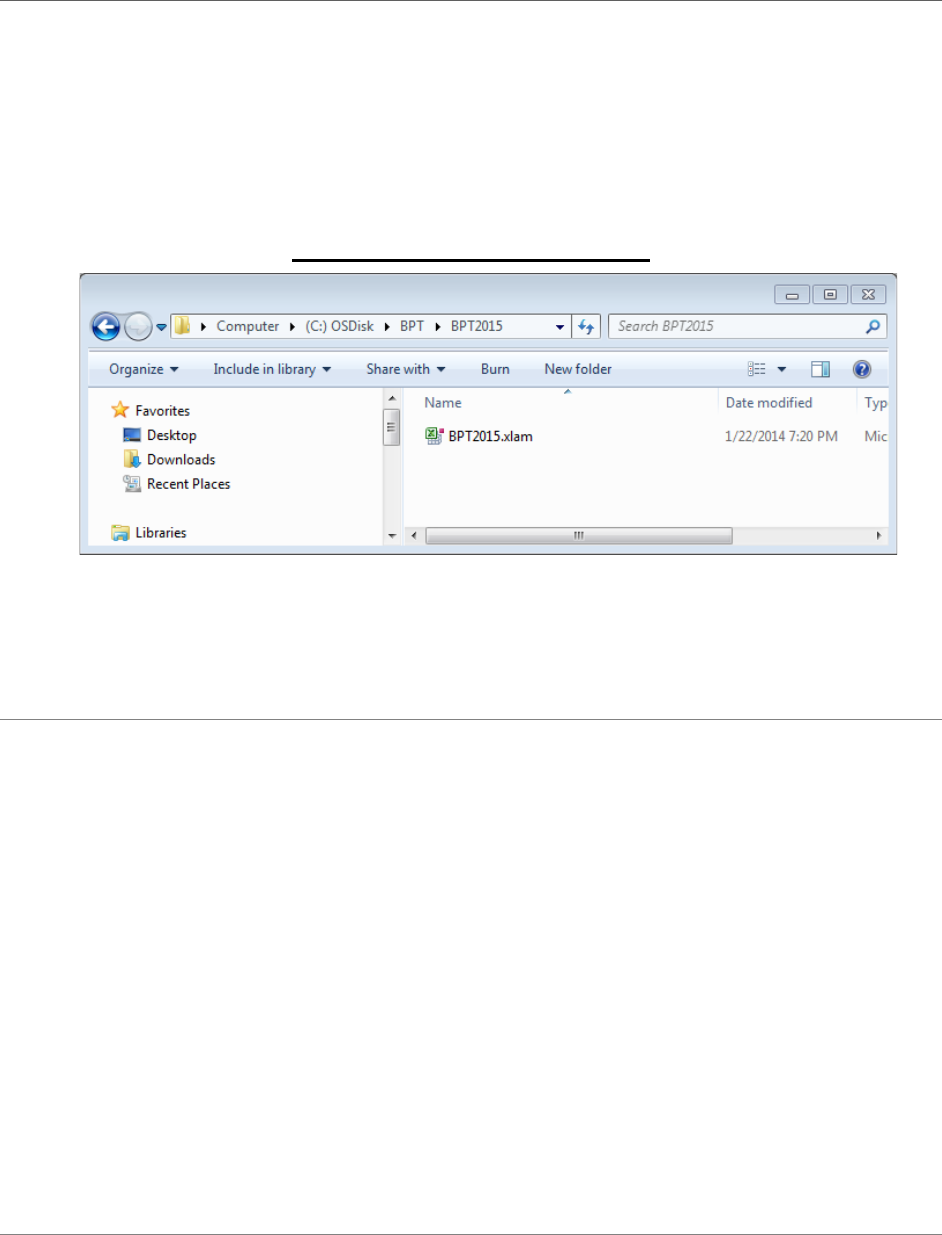
9. Verify that the BPT has been updated to the newer version by checking the version number
in the upper right hand corner of Worksheet 1: cell N3 (for PD workbooks), cell Q3 (for
MA workbooks), cell P3 (for MSA workbooks) or cell C1 (for ESRD-SNP workbooks).
The number after the period reflects the current version (e.g., MA-2021.1 indicates the
BPT is using version 1 of the Add-in).
Figure 16 - BPT Addin Location
Note: If you download the PBP software from the HPMS website, the BPT Add-in file will be
automatically saved in the C:\BPT\BPT2021 folder.
3.1.4 Update the Add-In for Multiple BPT Workbooks Using
the Batch Tool
1. Double-click the BPT Batch Process icon or the BPT2021 BatchProcess.exe file name to
start the application (after downloading the batch file per Section 3.1.2, above).
2. On the Select Process Option screen, select “Version Update”.
3. Click “Next”.
4. Using the files search window, locate the folder where you saved the BPT workbooks
(i.e., the “.xlsm” files).
5. Select the workbooks to update. (Use the Shift key or the Ctrl key to select multiple files.)
6. Click “Update”.
7. Review success or failure messages for the selected workbooks.
8. Verify that the workbooks have been updated to the newer version by checking the version
numbers in the upper right hand corner of Worksheet 1: cell N3 (for PD workbooks), or
cell Q3 (for MA workbooks), cell P3 (for MSA workbooks) or cell C1 (for ESRD-SNP
workbooks).
3.1.5 Finalize an Individual BPT Workbook
1. Open a completed BPT workbook.

CY2021 Bid Pricing Tool Technical Instructions
40
2. Select “Enable Macros” when prompted. (Only applicable if Macro security is set to
“Disable all macros with notification”.)
3. Invoke the Finalize BPT function by clicking the icon on the tool bar, selecting “Finalize
BPT” from the File menu, or pressing Ctrl+Shift+S.
4. If you receive any critical validation error messages, you must resolve the errors before
attempting to re-finalize your BPT. (See Section 2.1.4.1, “Finalization Process” for more
detail on the finalization process.)
5. Verify that the working file is saved in the designated folder and that the finalized backup
files are created in the same folder.
3.1.6 Finalize Multiple BPT Workbooks Using the Batch
Tool
1. Double-click the BPT Batch Process icon or the BPT2021 BatchProcess.exe file name to
start the application (after downloading the batch file per Section 3.1.2, above).
2. On the Select Process Option screen, select “Finalize BPT”.
3. Click “Next”.
4. Using the files search window, locate the folder where you saved the BPT workbooks (i.e.,
the “.xlsm” files).
5. Select the workbooks to update. (Use the Shift key or the Ctrl key to select multiple files.)
6. Click “Finalize”.
7. Review success or failure messages for the selected BPTs.
8. Verify that the working files are saved in the designated folder and that the finalized and
backup files have been created and saved in the same folder.
3.1.7 Use the Backup File to Restore a Prior Version of the
BPT
If the working version of the BPT has been corrupted, or you need to roll back to a prior version
of your BPT, restoring a backup version of your BPT may be necessary.
1. In Windows Explorer, locate the backup file in the same directory where the working file
is saved.
2. Right-click on the backup file name.
3. Select “Rename” from the menu.
4. Remove the word Backup from the file name and click enter.
5. Open the file, verify that the Add-in has loaded and the file is editable.

CY2021 Bid Pricing Tool Technical Instructions
41
3.1.8 Re-start the Batch Process if it is Abnormally
Terminated
1. Save and close any open non-BPT Excel workbooks.
2. Press Ctrl+Alt+Delete to launch the Task Manager, select the Processes tab, and then click
the “Image Name” column to sort the processes names.
3. Select EXCEL.EXE and click the “End Process” button. If more than one EXCEL.EXE
process is found, repeat this step to end all the EXCEL.EXE processes.
4. Close the Task Manager.
5. Double click the BPT Batch Process application icon or the BPT2021 BatchProcess.exe
file name to re-start the Batch Process.
3.1.9 Update PD National Averages in Multiple PD files
1. Double click the BPT Batch Process icon or the BPT2021 BatchProcess.exe file name to
start the application (after downloading the batch file per Section 3.1.2, above).
2. On the Select Process Option screen, select “Update PD National Average”.
3. Click “Next”.
4. Enter values in the input fields for the National Average Monthly Bid Amount and the Base
Beneficiary Premium.
5. Using the files search window, navigate to the location where you saved PD workbook
(.xlsm) files.
6. Select the PD files. You can use the Shift or Space key to select multiple files.
7. Click the “Update PD National Average” button.
8. Review success or failure messages for the selected BPTs.
9. After the process completes, verify that the PD files are updated correctly. A report will be
available in the same folder where the PD files are located.
Also, see Section 2.1.9.4, “Batch Update PD National Average Process.”
3.1.10 Update Multiple MA Files with PD Premiums
1. Double click the BPT Batch Process icon or the BPT2021 BatchProcess.exe file name to
start the application.

CY2021 Bid Pricing Tool Technical Instructions
42
2. On the Select Process Option screen, select “Update PD Premiums in MA”.
3. Click “Next”.
4. Using the top files search window, navigate to the location where you saved PD workbook
(.xlsm) files.
5. Select the PD files. You can use the Shift or Space key to select multiple files.
6. Using the bottom files search window, navigate to the location where you saved MA
workbook (.xlsm) files. Note: The MA files should match to the PD files selected above
(same Contract Number, Plan ID and Segment ID).
7. Click the “Update PD Premiums in MA” button.
8. Review success or failure messages for the selected BPTs.
9. After the process completes, verify that the MA files are updated correctly. A report will
be available in the same folder where the MA files are located.
Also, see Section 2.1.9.5, “Batch Update MA BPT with PD Premiums.”

CY2021 Bid Pricing Tool Technical Instructions
43
4.0 Troubleshooting and FAQ
4.1.1 Problems with the Add-In File
If you are having difficulty opening, saving or finalizing a BPT, check to see if more than one
copy of the CY2021 Add-in file is saved on your PC. To ensure you only have the latest copy of
the CY2021 Add-in file stored in the correct location, perform the following:
1. Delete all BPT2020.xlam files saved in C:\BPT\BPT2020
2. Download the BPT2021.xlam file from the HPMS website and save it in the
C:\BPT\BPT2021 folder. (See Section 2.1.1.2, “Installing the Add-in File.”)
3. Confirm that the macro security setting is set to “Disable all macros with notification”.
a. Open an Excel window.
b. Click Excel Options>Trust Center>Trust Center Settings>Macro Settings.
c. Verify that the macro setting is “Disable all macros with notification”.
d. Close the Excel window.
4. Confirm that the Add-in is unloaded properly.
a. Open an Excel window.
b. Click Tools then Add-ins.
c. Verify that both the CY2019 and CY2020 Add-ins are unchecked.
d. Close the Excel window.
5. Close all Excel windows on your PC.
6. Launch the Task Manager, select Processes tab, select EXCEL.EXE and click “End
Process” if applicable. Repeat for each instance of EXCEL.EXE.
7. Confirm that there is only one BPT add-in on the PC.
a. Click “Start”, select “Search”, and then the “For Files or Folders” option.
b. Enter BPT2021.xlam in the “Search” for “Files and Folders” name box.
c. Select Local Hard Drive C: in the Look In dropdown box.

CY2021 Bid Pricing Tool Technical Instructions
44
d. If multiple files are found, delete the BPT2021.xlam in any other folders and keep
only one BPT2021.xlam file in the C:\BPT\BPT2021 folder.
e. Repeat step c for any other local hard drives (e.g., D:\) that might contain the
BPT2021.xlam file.
8. Check the workbook to see if the issue is resolved.
4.1.2 Missing Add-in from the Toolbar
If you have difficulty with the Add-in or if the Add-in tab is missing from the toolbar, the Add-in
file has become corrupted or may not be configured correctly. To resolve this issue:
1. Temporarily rename or remove the Add-in file from the C:\BPT\BPTXXXX folder.
2. Close all Excel Files.
3. Open the BPT file.
4. Go to File> Options> Add-ins >Manage Excel Add-Ins. Click ‘Go’.
5. Uncheck the BPT20XX from the Add-ins list and click ‘Go’.
6. Rename/Replace the Add-in back to the original naming convention in the
C:\BPT\BPTXXXX folder.
7. Go back to the location in Step 4 and check the selection for the BPT20XX add-in and
click ‘OK’.
8. Confirm that the Add-in Tab in the ribbon loads correctly.
4.1.3 Frequently Asked Questions
The following contains a list of FAQs:
1. Question: Finalizing a BPT takes a longer amount of time in Excel 2013.
Answer: You may need to disable the graphics acceleration under display in the
Advances settings tab.
2. Question: When I open a BPT file, I only see the BPT Splash Screen. Where are the
other worksheets?
Answer: You may have multiple BPTs open in separate instances (i.e., windows) of
Excel or it may be due to a corrupted Add-in file. Close all but one BPT file or re-install

CY2021 Bid Pricing Tool Technical Instructions
45
the Add-in file. (See Section 4.1, “Problems with the Add-In File,” to re-load the Add-in
file)
3. Question: Why can’t I find the BPT commands, such as BPT Finalize, Circle Invalid
and BPT Refresh icons, on my Excel Toolbar?
Answer: The BPT icons are loaded with the ADD-INS Toolbar and they only appear
when the Add-Ins is enabled. Follow the steps below to load the Add-Ins Toolbar.
a. On the Excel, select file menu > Options > Add-Ins > Manage: Excel Add-Ins then
click “Go”. In the Add-Ins dialog box, select BPT2021 and click “Ok”
b. Close the Excel window.
c. Open the BPT.
4. Question: I have entered multiple County Codes (MA5.VI.3, MSA3.III.2, or ESRD-
SNP1.II), but the formulae are not copied into row 40 and below?
Answer: This may be due to the BPT add-in file not being properly loaded in the BPT.
Follow the steps in Section 4.1, “Problems with the Add-In File,” to re-load the add-in
file.
5. Question: The Macro Security setting on my PC is set to “Enable all macros” but I don’t
see the prompt when opening the BPT. Do I need to enable the Macros in another way?
Answer: If the Macro security setting is “Enable all macros”, the BPT Add-in file will
automatically run when you open the BPT; therefore, you don’t see the prompt to enable
macros. For security purposes, it is recommended that the Macro Security Level be set to
“Disable all macros with notification”.
6. Question: I encountered the following error(s) when finalizing the BPT, what should I
do? (See any of the below errors)
There was an error when finalizing the BPT.
Error 13: Type mismatch
Figure 17 - Error Message 1 in MA BPT

CY2021 Bid Pricing Tool Technical Instructions
46
Figure 18 - Error Message 2 in MSA BPT
Figure 19 - Error Message in PD BPT
Answer: If you receive any of these messages, check the referenced workbook cells and
verify that they do not contain # VALUE, # N/A, # REF, text, or #DIV/0!.
If the referenced cells do contain valid values, please check the entire workbook for cells
that either contains the #ERROR message or text values instead of numeric values. These
need to be corrected before you can finalize the BPT workbook.
7. Question: I received a “subscript out of range” error. What should I do? (Figure 20 -
BPT Addin Error)
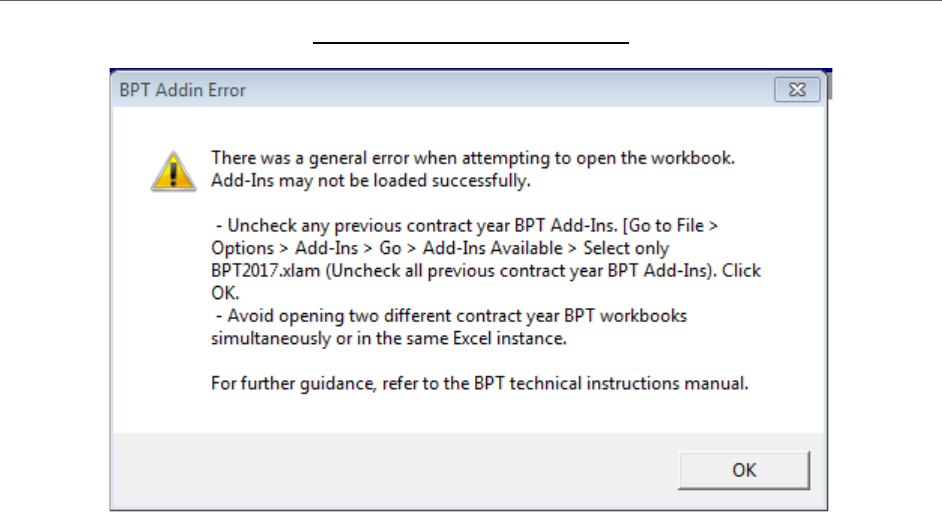
CY2021 Bid Pricing Tool Technical Instructions
47
Figure 20 - BPT Addin Error
Answer: CY2020 and CY2021 working files cannot be open in the same Excel instance
(window). Open the CY2021 working file in a different Excel instance. (Close all
workbooks and all instances of Excel. Open Excel and in the (first) instance open the
CY2021 workbook. Then open a second instance of Excel and open the CY2020
workbook. (See Section 2.1.2.2, “Version Compatibility.”) If this does not resolve the
issue, open an Excel window, select Tools, Add-in, and then make sure the “BPT2019”
and “BPT2020” boxes are unchecked. Open the BPT file in this Excel window.
For returning BPT users (i.e., those that used the CY2020 BPT), you may receive this error
message upon opening the CY2021 BPT for the very first time. If this error occurs, select
the “Tools” menu in Excel, select “Add-in” and un-check the “BPT2020” box. Verify that
the “BPT2021” box is checked. This will resolve the error when opening the CY2021 BPT
thereafter.
8. Question: I receive the following Run Time Error when opening BPT files in Excel 2010.
What should I do? (Figure 21 - Run Time Error)
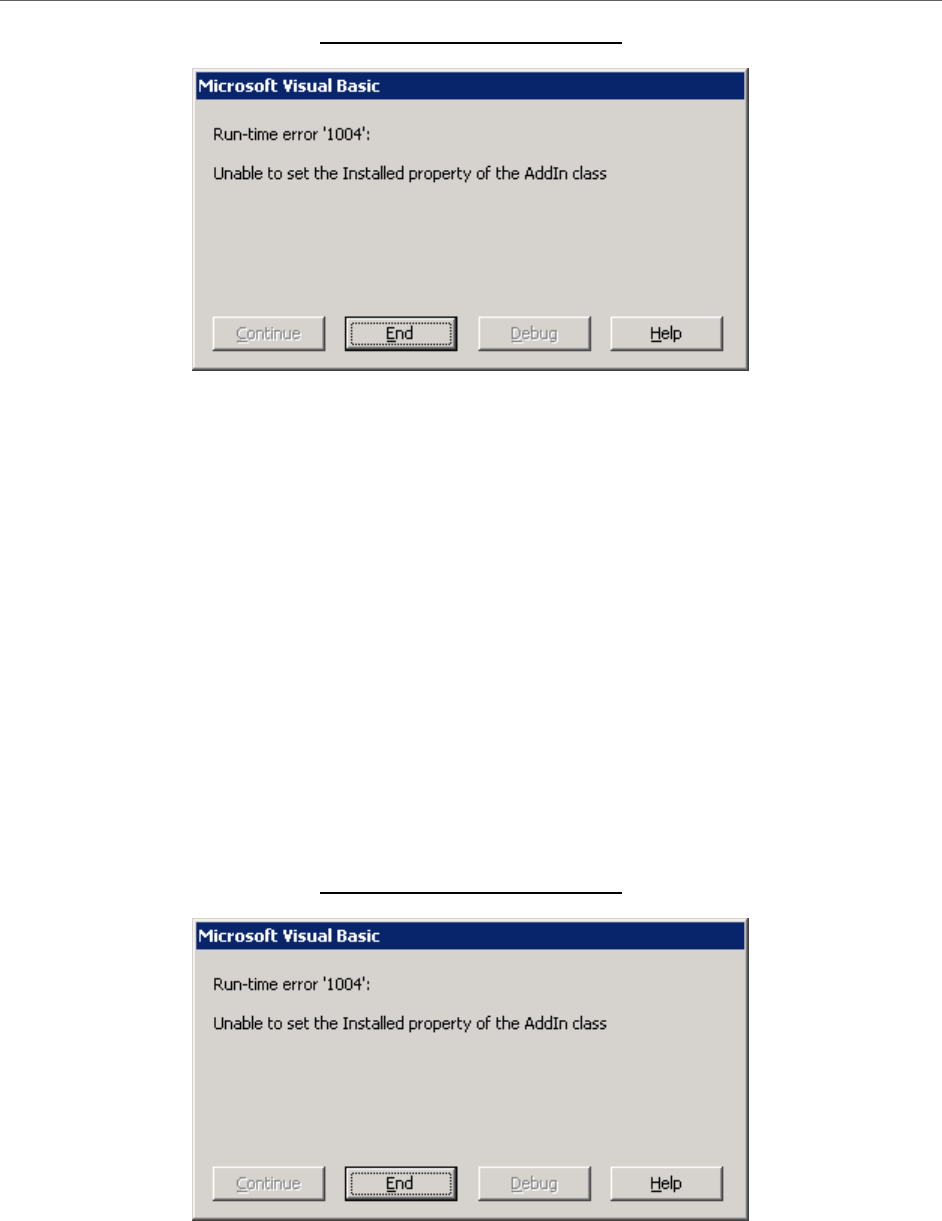
CY2021 Bid Pricing Tool Technical Instructions
48
Figure 21 - Run Time Error
Answer: This may happen if the Excel process does not load the BPT Add-in file properly
prior to opening and saving a working BPT file in the same Excel instance.
1. Open an Excel instance and click the Excel icon in the top left corner.
2. Click Excel Options then Add-ins.
3. Click “Go” next to the Manage Excel add-in box.
4. In the list of Add-ins, select the checkbox for BPT2021.
5. Close the existing Excel window and re-open the BPT file. If this does not resolve
the issue, follow the steps in Section 4.1, “Problems with the Add-In File,” to re-
load the Add-in.
9. Question: I receive the following Run Time Error when opening BPT files in Excel 2010.
What should I do? (Figure 22 - Run Time Error)
Figure 22 - Run Time Error
Answer: This may happen if the Excel process does not load the BPT Add-in file properly
prior to opening and saving a working BPT file in the same Excel instance.

CY2021 Bid Pricing Tool Technical Instructions
49
1. Open an Excel instance and click the Excel icon in the top left corner.
2. Click Excel Options then Add-ins.
3. Click “Go” next to the Manage Excel add-in box.
4. In the list of Add-ins, select the checkbox for BPT2021.
5. Close the existing Excel window and re-open the BPT file. If this does not resolve the
issue, follow the steps in Section 4.1, “Problems with the Add-In File,” to re-load the
Add-in.
10. Question: I am trying to open BPT files in Excel 2010, but I do not see the Option button.
How do I enable contents?
Answer: To enable the contents:
1. Click the Microsoft Office Button ( ) > Excel Options.
2. Click Trust Center > Trust Center Settings >Message Bar.
3. Click the first radio button below:
• Show the Message Bar in all applications when document content has been
blocked. This option is selected by default so that you get Message Bar alerts
whenever potentially unsafe content has been disabled. The option is not selected
if you clicked the “Disable all macros without notification” option on the Macros
pane of the Trust Center. If you click disable all macros without notification, you
will not get Message Bar alerts when macros are disabled.
• Never show information about blocked content. This option disables the Message
Bar.
11. Question: Why is the Excel window in the background while Batch is running, can I close
it?
Answer: No, you cannot close, edit or alter the Excel window while the batch is running.
The Excel window is a normal process of the Batch Tool. Interfering with the Excel
window can cause errors in the batch process.
12. Question: Why do I see “Protected View” when I open the BPT file?
Answer: Protected view turns on when you try to open BPT files directly from a network
folder or an outlook email or an internet site. You should save the BPT files in local
folder before opening.
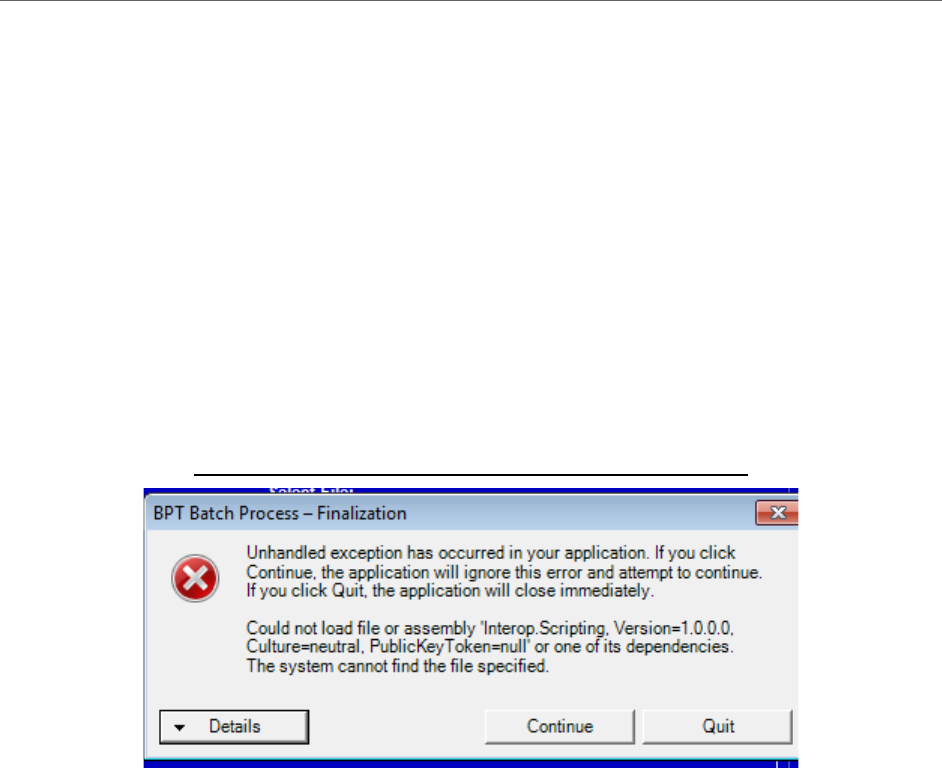
CY2021 Bid Pricing Tool Technical Instructions
50
13. Question: Why do I receive the error “Error updating the BPT – 1004: Cannot access
‘filename.xlsm” when I open the BPT file?
Answer: This error may be received when the user is trying to open the BPT via a
network drive (BPT only supports local drives), the version of Microsoft Office being
used is an older version and needs to be updated, or there are insufficient user privileges
to open the BPT files.
14. Question: Why do I receive the message “Unhandled exception has occurred in your
application” If you click Continue, the application will ignore this error and attempt to
continue. If you click Quit, the application will close immediately.” Could not load file
or assembly ‘Interop.Scripting. Version=1.0.0.0 Culture=neutral. PublicKey=null’ or one
of its dependencies. The system cannot find the files specified” when I open the BPT
file? (Figure 23 - BPT Batch Process Finalization Error)
Figure 23 - BPT Batch Process Finalization Error
Answer: In order to remove this error message the user needs to put all the dependency
files and .exe files together in one folder. (Figure 24 - Dependency and Execution Files)
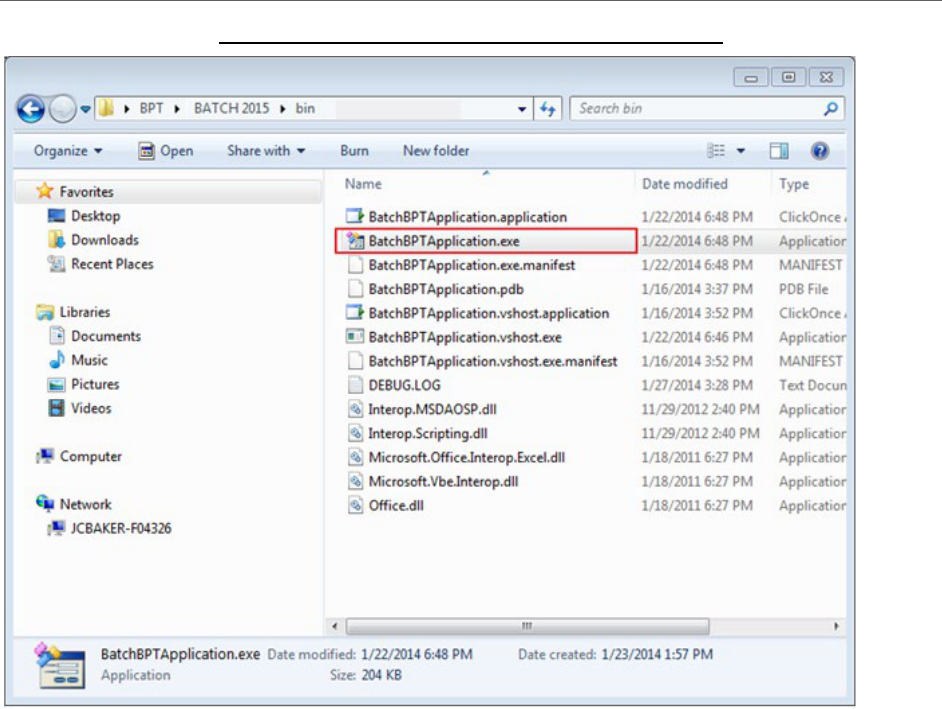
CY2021 Bid Pricing Tool Technical Instructions
51
Figure 24 - Dependency and Execution Files
15. Question: Why do I receive the error message “Data at the root level is invalid. Line 1,
position 1” when finalizing the BPT?
Answer: This issue is caused by an interaction between the new XML encryption feature
of the BPT workbooks and the Laserfiche plugin. The plugin is attempting to
automatically validate the XML output of the finalized BPT, but since the XML is
encrypted, it does not appear valid. Please ensure that the Laserfiche plugin is disabled
prior to finalizing the BPT files.
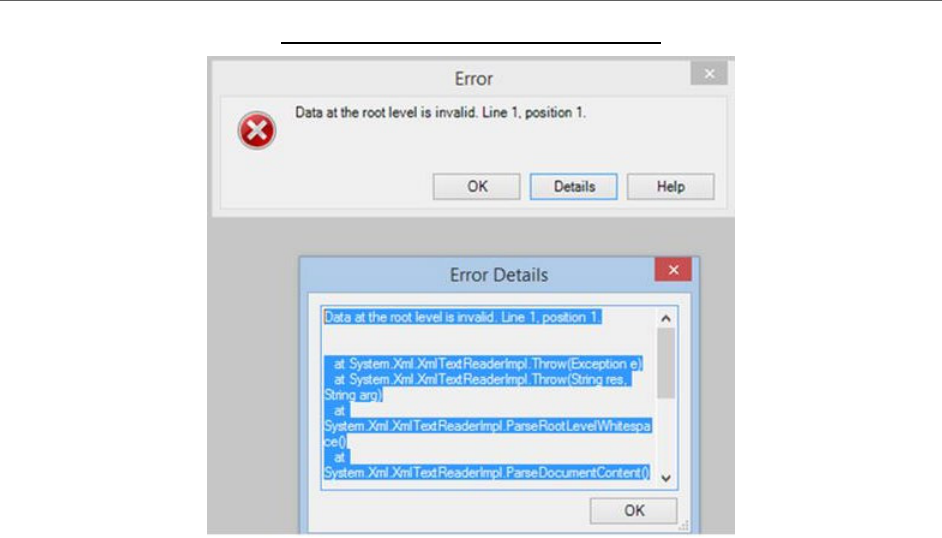
CY2021 Bid Pricing Tool Technical Instructions
52
Figure 25 - BPT Finalization Error
16. Question: Why do I receive the error message “Data at the root level is invalid. Line 1,
position 1” when finalizing the BPT?
Answer: This issue is caused by an interaction between the new XML encryption feature
of the BPT workbooks and the Laserfiche plugin. The plugin is attempting to
automatically validate the XML output of the finalized BPT, but since the XML is
encrypted, it does not appear valid. Please ensure that the Laserfiche plugin is disabled
prior to finalizing the BPT files.
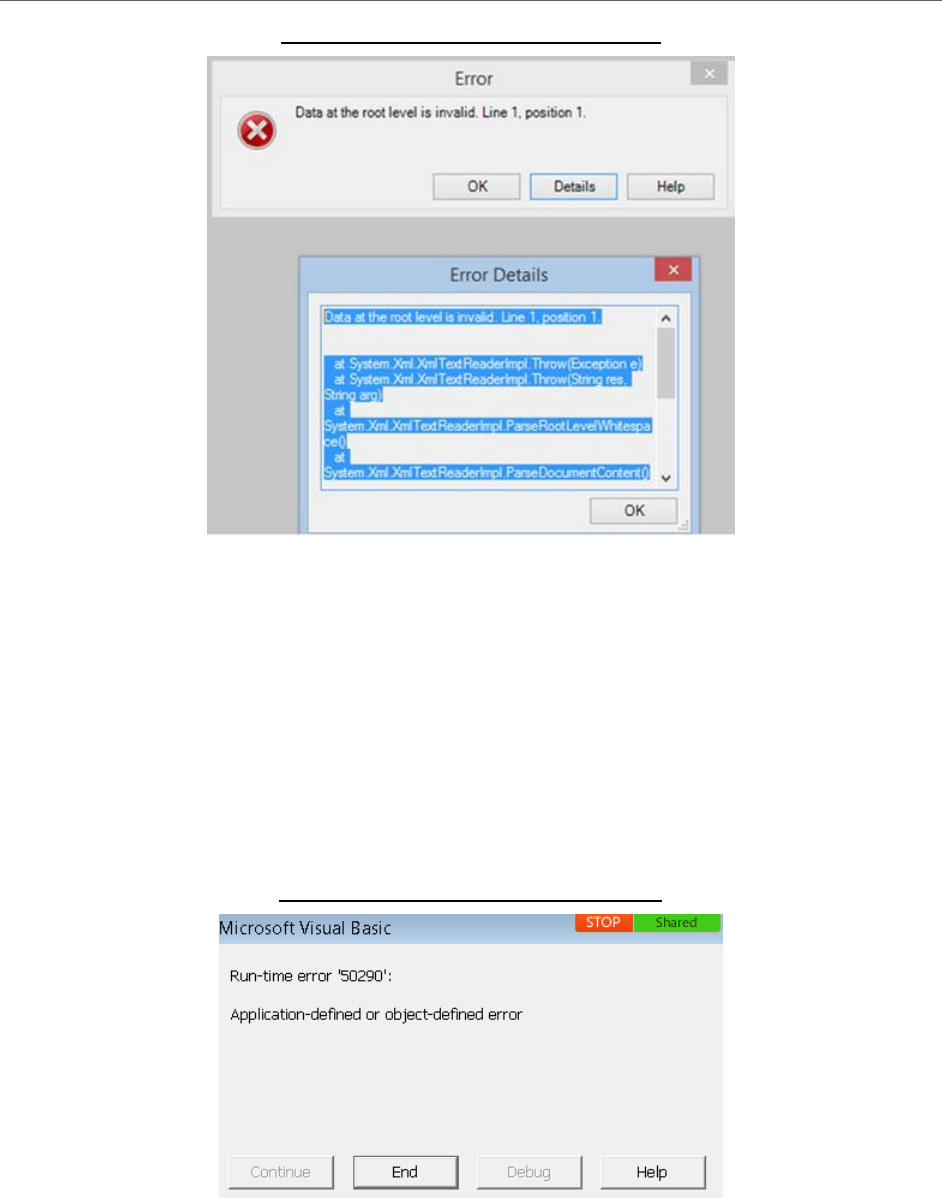
CY2021 Bid Pricing Tool Technical Instructions
53
Figure 26 - BPT Finalization Error
17. Question: Why do I receive the error message “Run-time error 91” when opening the
BPT?
Answer: This issue is caused by multiple instances of Microsoft Excel open. Please
close all instances of Microsoft Excel and re-open the BPT file.
18. Question: Why do I receive the error message “Run-time error 50290” when opening
the BPT?
Answer: This issue is caused by when Add-In file has Add-In enabled.
Figure 27 – Run-Time Error 50290
To resolve this issue:
1. Go to File Options Add-Ins Manage (Excel Add-ins) Select Go
(Figure 28 – Add- Ins Window)
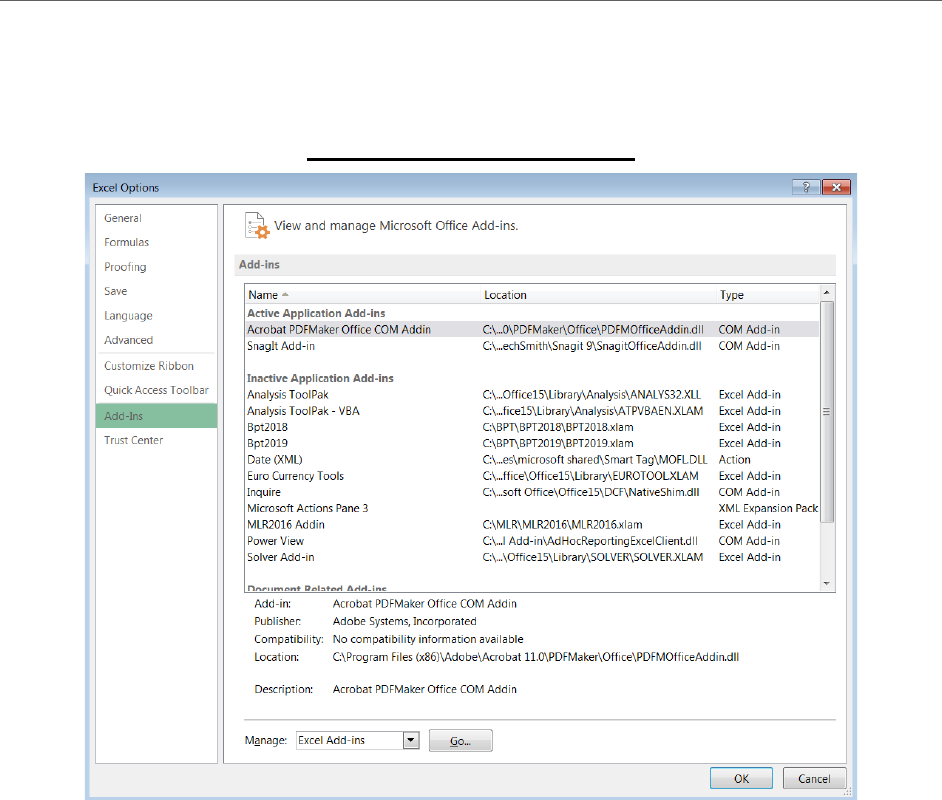
CY2021 Bid Pricing Tool Technical Instructions
54
2. Under Add-Ins Unselect BPT Add-In
Figure 28 – Add- Ins Window
19. Question: I am selecting the option in Batch Tool to “Update PD Premium in MA” and
getting an error.
Answer: Please follow the process under 2.1.9.5.
20. Question: Why do I receive the error message: “The add-in is with a different contract
year than the BPT files and you must place the add-in in the designated folder.” when
opening the BPT even though there are no other files on my system and the add-in is the
latest version?
Answer: If the issue is unresolved after following the steps in Section 4.1.1, the system
may be pointing to the old contract years’ add-in path.
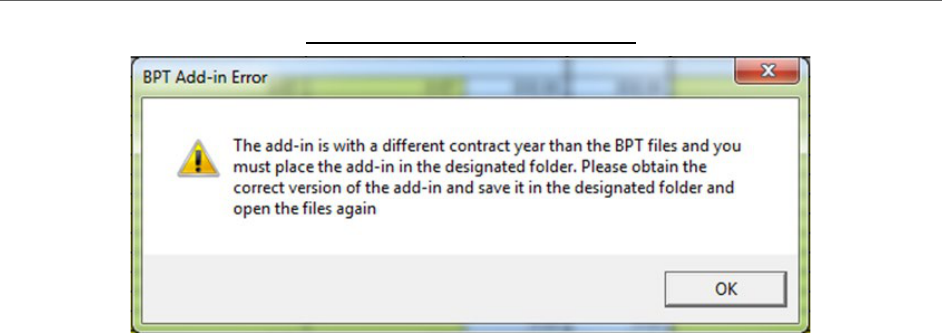
CY2021 Bid Pricing Tool Technical Instructions
55
Figure 29 – BPT Add-in Error
To resolve, this issue follow these steps to clear the registry and reconfigure with the
latest add-in:
1. Temporarily rename or remove the Add-in file from the C:\BPT\BPTXXXX folder.
2. Close all Excel Files.
3. Open the BPT file.
4. Go to File> Options> Add-ins >Manage Excel Add-Ins. Click ‘Go’.
5. Uncheck the BPT20XX from the Add-ins list and click ‘Go’.
6. Rename/Replace the Add-in back to the original naming convention in the
C:\BPT\BPTXXXX folder.
7. Go back to the location in Step 4 and check the selection for the BPT20XX add-in
and click ‘OK’.
8. Confirm that the Add-in Tab in the ribbon loads correctly.

CY2021 Bid Pricing Tool Technical Instructions
56
4.1.4 Support
If you need additional assistance, please call the HPMS Help Desk at 1-800-220-2028 or email
them at [email protected]ov.
